


Overview
Following on from our Medic Class Guide, here we provide you with all the information you need to maximise your damage output. The primary purpose of this build is for maximum damage in a PvE and PvP environment. Similarly to my Spellslinger DPS build design, this is all about being flexible in multiple scenarios and taking into consideration that perfect rotations are almost impossible in a true PvE or PvP setting. The reason why this build works so well in both PvE and PvP is the fact that as a Medic there’s only a couple of skills you need to melt face with, while the rest are free choices based on your play style. As a melee fighter, even though your range is a little higher than that of a Warrior or Stalker, you’ll still need a couple of Crowd Control skills to keep players close to you or for you to escape with.
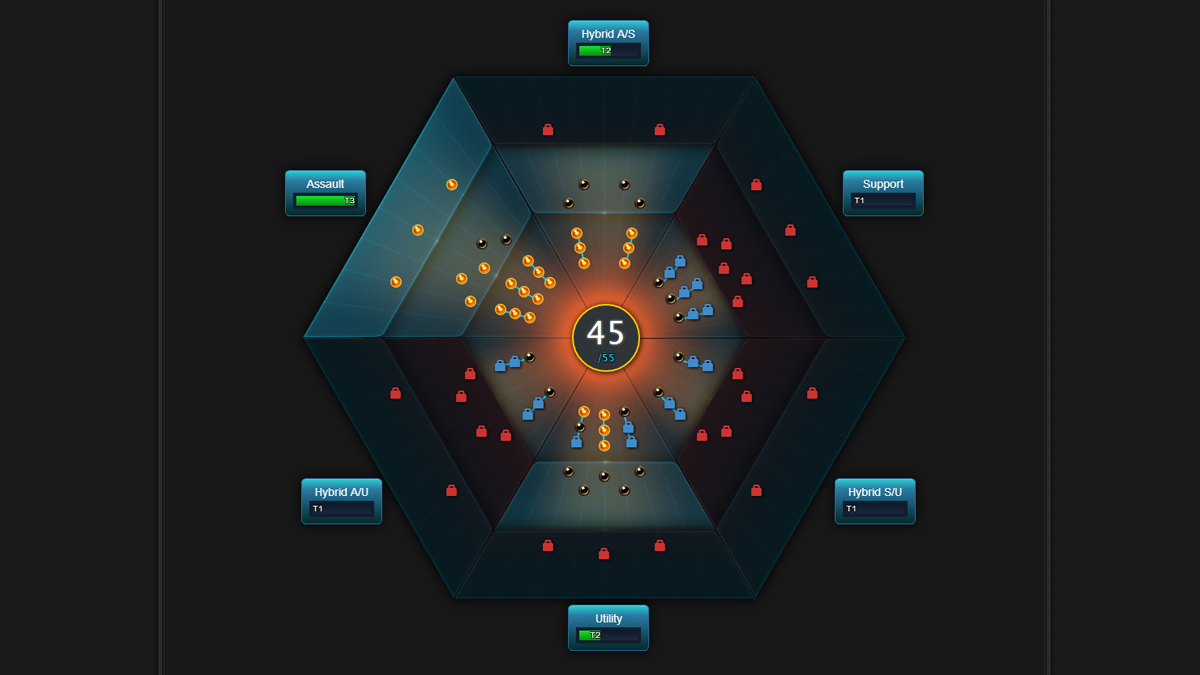
Full Interactive Medic DPS Build
Skills

Discharge
Discharge is your mandatory pump skill. It ‘ticks’ 3 times to build 1 Actuator but is capable of harming 5 foes at once. It’s repetitive to need to use this skill over and over but it’s a relief to know that its animation is satisfying and it actually does respectable damage. Unless your using other skills, you should always be using Discharge.
Fissure
Fissure is, similarly to Discharge, a mandatory skill for the Medic. It has a large radius, hurts and has a reasonably low cooldown. When Tiered up it also pairs exceptionally well with Quantum Cascade or Gamma Rays if used at full Actuators.
Gamma Rays/Quantum Cascade
I’m going to caveat this skill and state that it does depend entirely on the circumstance. For general PvE and PvP, Quantum Cascade is a much easier choice. It has a large radius, ticks 3 times and deals great damage. In contrast, Gamma Rays is hard to hit and very narrow. However, versus single target boss fights and in most dungeons, Gamma Rays is much more worthwhile. You should switch these
Atomize
Usable after a critical hit, Atomize is your melt face instant-gib button. Acting like Flame Burst on the Spellslinger, it hits up to 5 targets for high amounts of damage. On top of that it also has a 100% chance to build an Actuator and has a low cooldown (8 seconds). If Atomize triggers after Quantum Cascade + Fissure + Annihilation, it’s a massive damage spike.
Paralytic Surge
I tend to take Paralytic Surge because as a stun and as a skill that destroys an Interrupt Armor, it’s incredibly useful in both PvE and PvP environments. It’s great to hold players in place while you beat on them while it’s also an excellent skill for escaping if you turn, Surge and then run away.
Urgency
I love Urgency. Not only is it a teleport, but when Tiered up it removes snares, roots, holds and tethers. It’s excellent at getting into combat and exceptional at avoiding it. Without the Tiering Urgency is quite limited but still very viable. If you find yourself getting CC'd too much just drop the points from Fissure or replace Urgency with Calm.
Empowering Probes
Empowering Probes aren’t quite as good as a Warriors Power Link skill but they still provide a 10% damage bonus to you and anyone else affected by them. The cooldown is around 15 seconds when counting your AMPs so it’s fairly easy to keep up it active 90% of the time.
Tiers

The purpose of these Tier points is to create synergy between Fissure and Gamma Rays/Quantum Cascade while also factoring in Atomize. Primarily, using Fissure then Gamma Rays/Quantum Cascade provides a return on your Actuators and allows you to time the rotation to then throw down your Annihilation. Taking Discharge to Tier 8 allows you to obtain a 2nd stack of Power Charge per tick and Tier 8 Gamma Rays provides
AMPs
Assault
- Assault Power III - Increases Assault Power by 7.5% (total)
- Strikethrough III - Increases Strikethrough chance by 3% (total)
- Armor Pierce III - Increases Armor Pierce chance by 3% (total)
- Empowering Aura - Grants Empower to yourself and party members, granting 6% extra Critical Hit chance
- Core Damage - Consuming an Actuator grants Empower for 5s. Increases damage dealt by 1.5% and stacks 3 times (4.5% total)
- In Flux - While between 1 and 3 Actuators gain an Empower. Increases Assault Power by 12% of maximum
- Danger Zone - While within 8m of a foe gain Empower. Increases Assault Power by 17% of maximum (every 15 seconds)
- Meltdown - Using Energize causes you to deal 104% technology damage to 5 foes within 10 meters and apply Overload. Overload temporarily deactivates shields.
Hybrid A/S
- Critical Hit III - Increases critical hit chance by 6% (total)
- Critical Hit Severity III - Increases critical hit severity by 12% (total)
Utility
- Cooldowns III - Increases cooldown reduction by 15% (total)
- CC Resilience III - Increases CC resilience by 30% (total)
Rotation

Similarly to my Spellslinger DPS build, I’m going to caveat this by repeating the following:
People can number crunch the perfect rotation all they wish against target dummies but in reality, in a PvE and PvP setting, it just isn’t possible. You’ll have to move, you might get interrupted or you might miss.
What you need to remember with a DPS Medic is that aim is still important (though less so than the Spellslinger because their telegraphs are reasonably large) but also your sheer reliance on pump skills (Discharge). If you aren’t gaining Actuators, your damage is going to suffer massively. Just remember to repeatedly use Discharge at every spare moment and only ever use Energize when your Actuators are at zero and you want to spike your opponent. Lastly, always use Atomize the moment it becomes available. Key to really maintaining high damage is to remain within 8 meters of your opponents (for the Danger Zone AMP buff) and to also stay between 1 and 3 Actuators. This way you gain the additional In Flux damage bonus.
Starting with 4 Actuators Using Gamma Rays
- Fissure
- Annihilation
- Gamma Rays (x4)
- Empowering Probes
- Energize
- Gamma Rays (x2)
- Atomize the moment it becomes available, every time
- Discharge to 3 cores
- Repeat process 1 to 8
Variables
As mentioned above, I did caveat some skills based on personal preference and the fact there are some alternatives. I regularly mix and match my skills out dependant on the circumstance or enemy I’m facing (as you should).
What I’d suggest with this build and as mentioned above, is to remove Tier 4 from Fissure and place them into Urgency. Your damage will drop slightly but you'll be able to survive for longer. You can also remove Empowering Probes and equip Calm. You’ll deal even less damage due to the 10% loss from Empowering Probes but in a PvP environment you'll have much greater survivability and mobility. Lastly, remember to take Quantum Cascade to Tier 8 when you swap out Gamma Rays (depending on the situation).
To read the latest guides, news, and features you can visit our WildStar Game Page.
