


Overview
Having been considered top-tier for some time, Bakko is a powerful melee Champion that excels at shutting down enemies within confined spaces. With a powerful shield capable of reflecting projectiles, as well as an AOE shout that offers shielding to all those around him, he provides a great deal of utility. While he's somewhat weak to range if his Bulwark is down, he's still incredibly potent if he can reliably chain his attacks. Use of Valiant Leap into Shield Dash can lock enemies down for a long time, while a fully charged Blood Axe is capable of dealing high damage.
Bakko has a proud history, filled with bravery and courage. Most known for saving hundreds of people from getting slaughtered by the giants in the north. A heroic brawler armed with axe and shield. Bakko uses his shield to outmaneuver opponents and protect his teammates. Watch out for his earth shattering dash attacks, even calm warriors sometimes go berserk.
Bakko's biggest weakness is a lack of terrain, or highly mobile Champions who can easily avoid his fairly obvious telepgraphs.
Updated: 25 October 2018
Pros
Cons
A powerful deflect that's invaluable against ranged Champions
Fairly predictable kit
Lots of crowd control and utilityRelies heavily on scenary to maximize his stuns
Incredibly high burst potential
His Shield Wall is easily baited
Surprisingly mobile thanks to his leap and dash
No sustain outside of his War Shout
Capable of trading well against most melee compositions
His Ultimate is super easy to avoid
Abilities

War Axe (LMB) - Allowing Bakko to empower his Blood Axe, it's incredibly important that you reliably land 3 stacks so that your throwing axe deals maximum damage. While it doesn't have a huge arc, as long as you land a slow against your target you can comfortably swing away for solid damage.

Blood Axe (RMB) - Your primary means of poke and early control (thanks to some key Battlerite's), Blood Axe deals high damage when it has three charges available (thanks to War Axe). As a projectile with a fast travel speed but thin telegraph, it can take some practice to reliably land. I'll also add that missing Blood Axe can be fairly punishing, as it's often key to following up with your other abilities. Practice against AI and moving targets in the training arena definitely helps reliably land this ability.
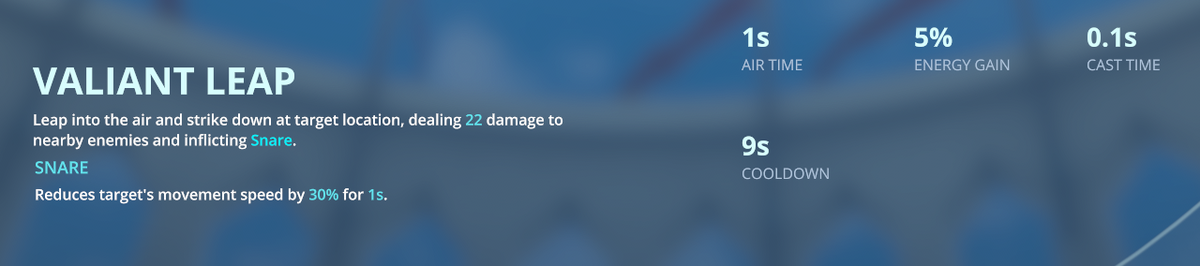
Valiant Leap (Space) - Despite its obvious telegraph, Valiant Leap is key to Bakko's kit. Not only is it his primary for of mobility, but it also allows him to leap over scenary and heavily snare anyone he catches. Although mobile Champions can typically avoid it with relative ease, if it's used at a time where your opponent has no "out", Valiant Leap can begin Bakko's high damage rotation. Valiant Leap into Shield Dash (scenary impact) followed by a fully charged Blood Axe deals massive damage. Just try to judge where you think enemies will be, so that you can reliably land it.

Bulwark (Q) - A powerful ability that reflects all projectiles, while stunning any melee Champions that strike it, Bulwark is ridiculously strong for zoning, peeling, and protecting yourself and allies. Denying key abilities such as Jade's Snipe, or to mitigate the attacks of Champions like Freya or Croak ensures Bakko can control a fight. It has a lengthy cooldown, so it's incredibly important that you use it only when you need to buy time, or reflect a powerful attack. Using it to mitigate small basics, when your opponent may have a powerful projectile, isn't wise use of the ability. Finally, remember that Bulwark reflects projectiles perfectly back to its source- meaning you'll always hit those who stand still after their shot.

Shield Dash (E) - Important for its mobility as well as its utility, Shield Dash isn't just about closing a gap: it's imperative for locking down enemies when you hit them against scenary. Used without the impact of smacking enemies against a wall its value is limited. However, if you can reliably utilise it against scenary, it can ensure that your subsequant attacks are easy to land, while it also gives your team opportunities to dive in with you. Just be conscious of the fact that its range isn't huge, but is often enough to avoid a key ability or reach someone that thinks they're far enough away from you.
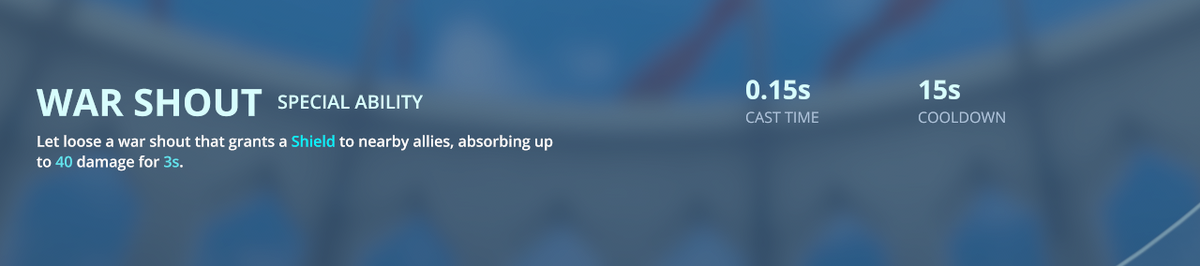
War Shout (R) - An instant cast shield that's also granted to all nearby allies, War Shout's value is in providing mitigation and sustain for Bakko and his team. While it won't save him from huge amounts of pressure, it will reduce the damage threat of key abilities, or give him enough survivability to trade versus another melee opponent. Just be conscious of the fact the shielding doesn't last long, so you need to use it when you're on the receiving end of damage.
EX Abilities

War Stomp (Shift + Space) - As a sexxed up version of Valiant Leap, War Stromp simply allows Bakko to incapacitate all enemies caught in his radius upon landing. The incapaciate is amazing for buying time, allowing your team to steal the central Orb, or just to coordinate your Ultimate against a target. Just be conscious of the fact it deals reduced damage, and any subsequent damage against those affected will break the crowd control.

Shield Slam (Shift + E) - Providing an additional snare upon impact, Shield Slam still offers the stun when it collides an enemy into a wall, but the additional crowd control gives it greater utility when there is no scenary. The slow against enemies that in the center of the arena provides Bakko with some much needed control, and allows him to keep enemy players pinned down.
Ultimate Ability

Heroic Charge (F) - Dealing massive damage and eventually causing a stun, Heroic Charge can instantly kill low health Champions. That said, Heroic Charge is super easy to avoid for most Champions so you need to use it when your enemy has exhausted their "outs", or if you can follow up with crowd control. If you do land Heroic Charge, try to use Shield Dash straight after for a double-dose of stuns and damage.
Battlerites
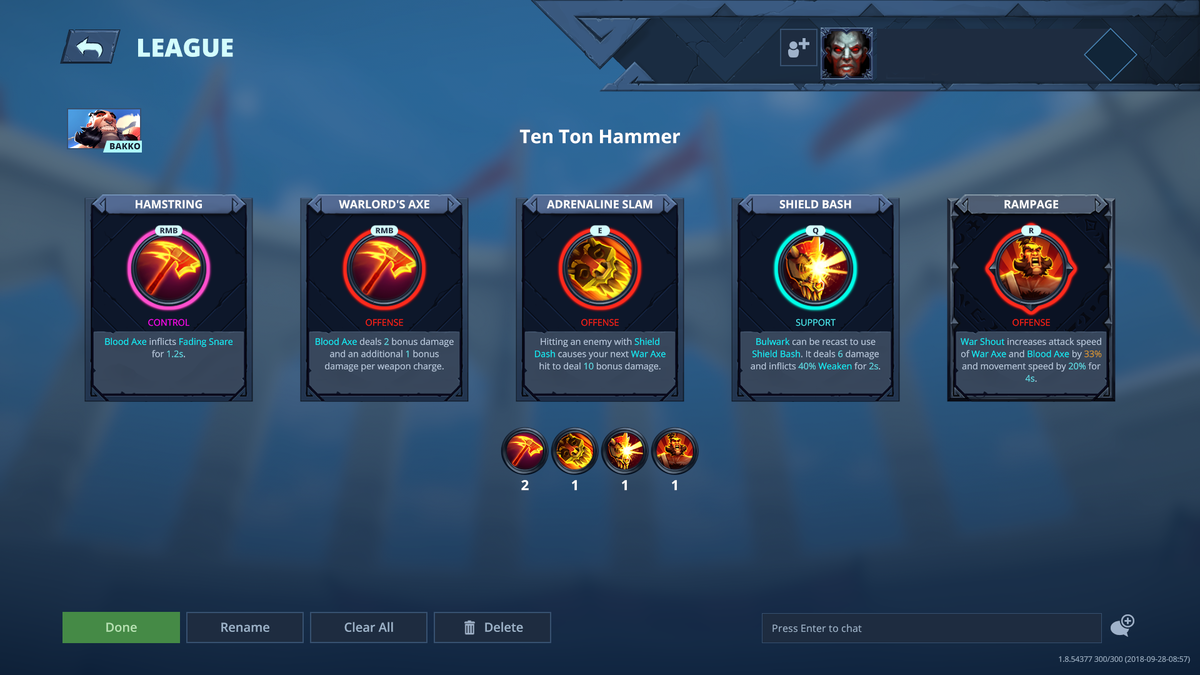
Hamstring
Allowing Bakko to slow with his Blood Axe, Hamstring provides some much needed control while ensuring he can chase and kite with ease.
Warlord's Axe
Beefing up Blood Axe even more, Warlord's Axe provides even greater bonus damage on multiple charges, ensuring he can lop off large amounts of health with 3 stacks.
Adrenaline Slam
Considering you'll immediately swing your War Axe when you've stunned or hit an enemy with Shield Dash, Adrenaline Slam increasing your next basic damage by 10 ensures even greater burst damage.
Shield Bash
While the damage from Shield Bash isn't amazing, the fact it causes weakness for 2 seconds - while giving Bakko a little nudge forward - provides greater utility and allows him to trade 1 on 1 much easier.
Rampage
Easily his strongest Battlerite, Rampage allows him to move quicker and swing 33% faster when he uses War Shout. For going ham on a target who's locked down, it's amazing.
Matchups
These Hero Threat Levels (1 being lowest threat and 10 being highest threat) are to help you determine which enemy Heroes can give you a headache. For the Heroes listed here, take extra care as they're particularly dangerous for Bakko.
Hero
Threat
Ezmo: His speed, rapid attacks, ability to shield himself and his long ranged poke allows him to avoid your abilities, and land his.
8/10 Iva: Her Flamethrower can cut through your shield, and when it's down, she can kite and poke comfortably with her Rocket. 8/10 Jumong: Rain of Arrows combined with his Bear Trap ensures he can kit you for days, and bait your shield easily. 8/10 Raigon: A well skilled Raigon can be fairly relentless, and will pursue you with ease - even if you carefully manage your leap and shield. 7/10 Ruh Kaan: His silence, pull, ranged poke and teleport are annoying. His Shadowblast can also ease a chunk of your health instantly if your shield is down. 7/10 Thorn: His pull and dive potential makes him a real headache. His sustain also ensures he can trade with you fairly easily, while dodging your key abilities. 9/10Tips
1. Try to always ensure you have your weapon fully charged. You can gain free charges by hitting the Orb if you can't reach your enemy.
2. Your primary means of poke is your Blood Axe. Don't just walk into a fight: ranged Champions will cut you down. Poke regularly until you can see an opponent to dive with Valiant Leap.
3. A fully charged Blood Axe will steal the central Orb with ease if you hit it when it's just below half health.
4. With Battlerite's, Blood Axe slows enemy players you hit. Use this to reliably land Valiant Leap, or to follow up with Shield Dash.
5. Valiant Leap is predictable, but amazing for stealing the central orb. Its impact damage is high, allowing you to pinch it upon landing when it's low health.
6. Valiant Leap is an important ability for evading damage as much as it is engaging. Need to escape an Ultimate? Jump away. Need to pursue someone? Jump to follow them over scenary. It's important you gauge when and where to use it, as without it, you can often be shut down - even more so if Shield Dash is on cooldown.
7. By default Valiant Leap causes a snare. Use this to lock enemies down, or to buy you time to escape.
8. Only use Bulwark when you are sure that you'll receive damage from melee or range. It's too important to waste, and most skilled players will attempt to bait it by cancel-casting their strongest (predictable) abilities. Don't instantly use it the moment you see a Champion such as Jade reaching for her Snipe.
9. Use Bulwark to body-block in front of the Orb to deny the enemy a capture.
10. It's also worth using Bulwark to protect an ally under fire, not just yourself. Navigating to allies under attack with Bulwark up will often buy them time to escape, and ensures you take the hits for them.
11. Try to save Shield Dash so that you can always collide with scenary. Its distinctly average as just an engage tool, or unless using the EX variant. With its stun however, it ensures you can deal massive damage.
12. Shield Dash is just as valuable as a tool for quickly escaping, or avoiding a key ability. Don't be afraid to use it defensively.
13. War Shout only lasts 3 seconds. Make those seconds count by using it the moment you're next to an opponent, or when an ally is under immediate threat.
To read the latest guides, news, and features you can visit our Battlerite Game Page.
