


Overview
Destiny is a complex and challenging Champion to play. Falling somewhere between Iva and Jade, she bricks damage and utility. Unlike her peers, much of this comes in the form of personal shielding, knockbacks, or zoning. What's particularly interesting about Destiny is the fact she's a hybrid Champion that can remain fairly mobile. Although she still relies heavily on her counter to escape tight situations, it isn't a crutch to her effectiveness.
An elite sky ranger from the secluded, invisible city of Enza. Many years of rigorous combat training using Magi-tech weaponry makes Destiny an agile and deadly forced to be reckoned with. Fed up with the strict regulations of living in Enza, Destiny often escapes the city to blow off steam and have fun in the arena.
Although Destiny relies heavily on the burst of her Charged Bolt, and while she cannot directly protect allies unless using her EX ability or Plasma Wall, she still remains a nuisance as long as she stays at maximum range. Her greatest weakness is the inability to survive against repeated dives, but if she carefully manages Magnetic Orb and Sky Strike, she can often survive long enough to reach allies, or finish off an opponent.
Updated: 6 June 2018
Pros
Cons
A fantastic kit that offers damage, utility and zoning
She is challenging to play against dive compositions
Magnetic Orb is fantastic for escaping and peelingHer basic attacks and Charged Bolt are fairly easy to avoid
Consistently high damage on her basic attacks
Skilled players avoid triggering her counter
Plasma Wall is exceptional
Pinball is fairly weak when the arena is shrinking
Incredibly strong in 2 v 2
It's challenging to always explode Mega Sphere
Abilities

Power Blaster (LMB) - Allowing Destiny to fire a single projectile, Power Blaster plays directly into your RMB (Charged Bolt). Dealing solid damage, albeit with a relatively slow pace, Power Blaster can pressure most enemy Champions with ease. It's also strong in the sense that with its long range and only having one projectile, landing it reliable can lop off a large amount of health from an enemy.

Charged Bolt (RMB) - Acting similarly to Jade's Snipe, Charged Bolt allows Destiny to release a high damage projectile from a long distance. Those struck receive more damage based on the distance (similarly to Ezmo's Chaos Grip) while also being debuffed with Spell Block. This debuff will then silence anyone affected, who uses an ability. It's a one-two punch that offers burst and utility all in one. Best of all, Charged Bolt can be used while moving, allowing Destiny to position herself against enemies who think they're out of sight. If you can, try to always save Charged Bolt for an orb steal, or to burst down a Support Champion.

Magnetic Orb (Space) - Allowing Destiny to zip away at rapid speed, Magnetic Orb not only clears crowd control but deals reasonable damage, while also offering a knockback. No Champions can escape you when charging towards them, and the knockback helps you protect team mates, or to buy you additional space if you quickly nudge an opponent away. As your main form of defence, it's important not to waste Magnetic Orb. Skilled players will avoid your counter, so having Magnetic Orb available is key to surviving. By all means use it offensively, but only if you can be sure you can escape when needed.

Sky Strike (Q) - Acting similarly to many other counter abilities, Sky Strike allows to lift herself out of combat when triggered, and deal damage to those below her. The aerial leap is an i-frame, allowing her to mitigate abilities such as Croak's Ultimate, while you can then reposition after firing by holding your choice of direction. The damage on Sky Strike is high and the firing distance is long. Be sure to predict where the enemy will move to as you're suspended in the air, and use the directional to play aggressively, or defensively.
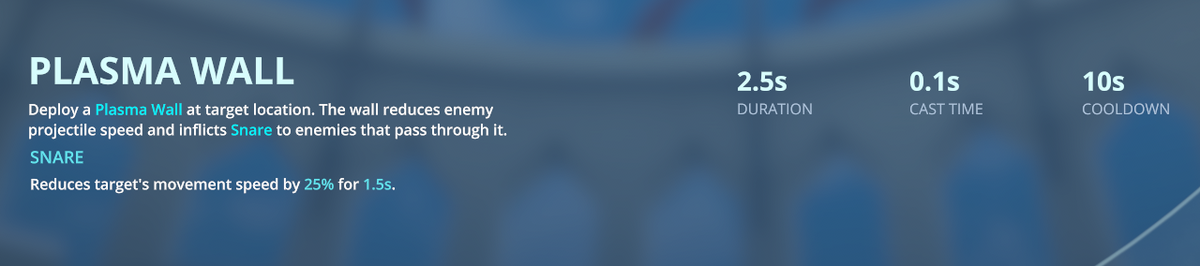
Plasma Wall (E) - Undoubtedly one of Destiny's strongest abilities, Plasma Wall allows her to project a barrier from a significant distance. Those caught are snared, and all projectiles are seriously slowed. Plasma Wall, while great as a defensive ability, is also fantastic when used aggressively. You can intentionally deploy it directly on a player, causing an instant snare that allows you to land some very easy basic attacks. Against ranged heavy compositions, you want to ensure it's always available to place in front of an Orb, while it's also good at zoning the enemy from your team.

Mega Sphere (R) - Arguably her most difficult ability to get the most out of, Mega Sphere is a very slow moving projectile with a wide radius. It will eventually detonate by itself, but can also be forced with your LMB or RMB. It's often difficult to detonate it if you've lots of objects in front of you, or if you can't quite get the sight line. I've found it's particularly useful to use it at point-blank range, or when an enemy is caught in your Plasma Wall. If nothing else, it's fantastic for zoning the Orb against melee Champions.
EX Abilities
![]()
Transform Weapon (Shift + LMB) - I would argue that Transform Weapon is probably Destiny's strongest ability. Allowing her to shield herself or an ally by repeatedly landing her basic attacks. 1 on 1 it allows Destiny to trade easily with opponents, while it allows her to protect allies under serious pressure. You won't constantly use it, but it's undeniably good at allowing Destiny to sustain herself when she needs to.

Lockdown (Shift + E) - Acting as a ground tether, the stun of Lockdown only triggers if those snagged pass through its outer wall. The duration of the ability is fairly long, and also allows you to still deal damage to those caught inside. It's best used against particularly challenging melee Champions such as Raigon or Rook, as it buys you breathing room to retreat or regain cooldowns. Alternatively, use Lockdown and then Mega Sphere for an instant burst. Just be aware there's a short delay on the projectile, meaning you have to aim it well.
Ultimate Ability
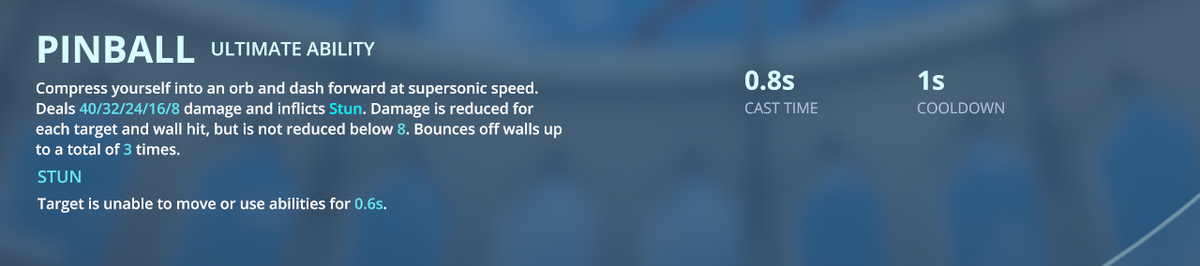
Pinball (F) - Although its use is limited when the arena walls are retracting, Pinball is an instant burst of damage that not only stuns, but has the potential for significant damage if you manage to pinball off scenary. Ideally you want to always aim for one person, rather than going out of your way to land on scenary. The 40 damage and stun alone can often finish off players that are low, any ricochet is just a bonus.
Like our Destiny build guide? You can help support its updates by subscribing to Ten Ton Hammer. Here's the details.
Gold : $1.00 USD - monthlyPlatinum : $5.00 USD - monthlyMaster : $10.00 USD - monthlyGrandmaster : $20.00 USD - monthlyLegendary : $50.00 USD - monthlyBattlerites
 Violent Revolution
Allowing Destiny to deal 6 bonus damage with Magnetic Orb, Violent Revolution also provides her with a far greater knockback. When defending yourself or hunting down low health Champions, it allows you to play particularly aggressively.
System Shock
System Shock elongates the duration of Destiny's Silence (from her Charged Bolt) from 0.7 seconds, to 1.4 second. The duration increase is huge, and buys her and her team time to burst down an opponent.
Power Attachment
Boosting Destiny's RMB based on the length of time you charge it, Power Attachment's damage bonus helps burst players, control the central Orb and generally gain greater power output. That's never a bad thing.
Blast Processing
Blast Processing allows Destiny to deal increased damage from her counter, while increasing its blast radius. For snagging multiple Champions, and finishing off low health players, the boost is significant. Bringing the total damage up to 30 is fairly big.
Sizzle
Sizzle is fairly mandatory for Destiny and allows her to deal additional damage to, and seriously slow those caught in her Plasma Wall. Used on a player, they'll instantly trigger slow, allowing you to gain a clear shot.
Matchups
These Hero Threat Levels (1 being lowest threat and 10 being highest threat) are to help you determine which enemy Heroes can give you a headache. For the Heroes listed here, take extra care as they're particularly dangerous for Destiny.
Hero
Threat
Croak: Because he's so mobile, a good Croak is relentless and can hunt you easily: hard to land your abilities against him. 8/10Ezmo: His speed, rapid attacks, ability to shield himself and his long ranged poke makes him a headache to avoid if he dives you.
8/10 Raigon: A well skilled Raigon can be fairly relentless, even if you knock him away with Magnetic Orb. 8/10 Ruh Kaan: His silence, pull, ranged poke and teleport can keep you permanently on the back-foot. 7/10 Shifu: A good Shifu will always be challenging, especially because of his burst, Counter and invulnerability. If you miss a single Tazer, you'll be in trouble. 7/10 Thorn: His pull and dive potential makes him a real headache. Even if you escape with Magnetic Orb, it's not long until he can return onto you (while still attacking from afar). 9/10Tips
1. Lead your shots when using Power Blaster. You can't really afford to regularly miss the single projectile it fires.
2. Remember that Power Blast reduces the cooldown of Charged Bolt by 1 second for each projectile you land against an enemy Champion. Keeping those hits up is key to having Charged Bolt regularly available.
3. Always try to have Charged Bolt available for when an Orb spawns. You can deal at least 32 damage to it when fully charged, allowing you to steal it with ease if the Orb is at half health or less.
4. You can move while using Charged Shot. Use this to your advantage against static Champions who have to remain stationary while using some abilities (such as Jade or Iva).
5. You don't always have to use Charged Shot at full charge. You can quickly tap your RMB for an instant close-quarter attack that deals damage, and still silences opponents. It's greater for shutting down melee attackers.
6. Ideally try to land Charged Bolt on an opponent that's already under pressure. The burst and silence will allow you and your team to lop off a considerable amount of health.
7. By all means use Magnetic Orb aggressively, but be conscious of the fact you're then incredibly vulnerable to dive. Clever players won't trigger your counter.
8. You can use Magnetic Orb to bump the central Orb out of the way. This can often work in your favor if you knock it far enough to prevent the enemy stealing it.
9. Remember that Magnetic Orb only knocks back the first enemy Champion you run into. After that, you'll simply roll up to and around opponents.
10. Sky Strike is first and foremost a counter. Use it to completely negate an attack such as Rook's Rush or Ezmo's Chaos Grip.
11. Always position yourself after Sky Strike is triggered by holding down the direction you want to move to. In most circumstances, away from your opponent is a safe bet.
12. Plasma Wall can be used aggressively, and cast directly on an opponent. This ensures if they do move, they're snared (or rooted with Battlerites)
13. Cast Plasma Wall in front of the central Orb to protect it from ranged projectiles. This should buy your team time to snatch it.
14. If you can root an enemy with Plasma Wall, follow up quickly with Charged Bolt > Power Blaster > Magnetic Orb. It's a very fast burst few can avoid.
15. Mega Sphere is as much a tool for zoning as it is dealing damage. Don't feel pressured to detonate it: it will explode on its own.
16. Transform Weapon is best used 1 on 1, or when a team mate is under heavy attack. The shielding it offers is amazing for trading with opponents.
17. Lock Down is fantastic against multiple Champions. If you snag 2 or more at once, the stun (or restriction) is a win-win for your team. Ideally, follow up a Lock Down with a Plasma Wall on the same victims.
Thanks for reading our Destiny build guide. You can help support its updates by subscribing to Ten Ton Hammer. Here's the details.
Gold : $1.00 USD - monthlyPlatinum : $5.00 USD - monthlyMaster : $10.00 USD - monthlyGrandmaster : $20.00 USD - monthlyLegendary : $50.00 USD - monthlyTo read the latest guides, news, and features you can visit our Battlerite Game Page.
