


Overview
It’s fair to say that Jumong is a challenging Champion to play. There’s no doubting his potency, but he’s a complex Champion that requires perfect aim and positioning. Miss-time an ability or stand in the wrong place, at the wrong time, and you can quickly die. Unsurprisingly, Jumong has a fairly rough reputation in Battlerite. I regularly see players complain when they see him, and that’s largely as a result of him being a Champion with a high skill ceiling.
Jumong is a trophy collector who has wandered the wildlands in pursuit of a worthy challenge. No longer being content with hunting the great beasts of the world has led him to enter the arena, looking for a new type of prey. He traps foes and ends them with a well placed shot from his mighty bow.
With a great deal of area denial at his disposal, alongside a powerful root in his Bear Trap, and burst from his Steady Shot, he’s strong in the right hands. If he can lock down a player with Bear Trap, and have his team capitalize on their vulnerability, few can survive for long.
Although Jumong has a fairly steady style of play, with somewhat lengthy cooldowns, he is undoubtedly fun to play. Landing his skill shots takes practice, but is rewarding, while he can be oppressive in the hands of an experienced player. Even his mechanic, of building charges to trigger double-casts of his abilities significantly increases his learning curve.
Updated: 25 September 2018
Pros
Cons
A varied kit that offers lots of area denial
Dragon Slayer is easily predicted
If left to his own devices, he can cause any team huge problemsVery vulnerable to dive compositions
Bear Trap is fantastic with the right Battlerites
Needs perfect aim to reliably charge his bow
Rain of Arrows is amazing for gaining Energy quickly
Very challenging to play in 2's
Seekers Mark offers excellent sustain
Fairly lengthy cooldowns
Abilities

Hunting Arrow (LMB) - Hunting Arrow is your basic attack an integral to your kit. Allowing you to charge your bow for each arrow you land (up to a maximum of 3), you need the charges to gain a free cast on three of your abilities. Fundamentally, by obtaining 3 charges you gain much greater kit choices: need more burst? Have two Steady Shots. Need greater AOE damage? Use Rain of Arrows twice. Under serious pressure? Cast back-to-back Black Arrows to gain serious distance between you and your opponent. While Jumong can function fine without 3 charges in his bow, his options are vastly improved when he does.
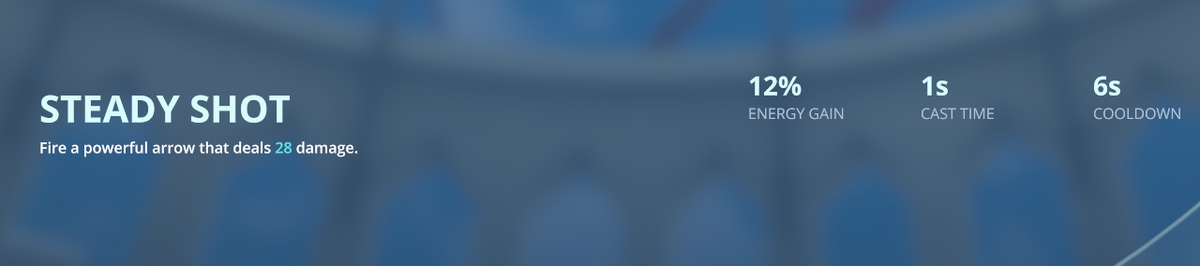
Steady Shot (RMB) - Steady Shot is similar to Jade’s Snipe, and allows Jumong to cast a high damage projectile straight forwards. He cannot move during it, but it’s more than capable of eating a chunk of an opponent's health. Ideally you want to use Steady Shot when opponents can’t avoid it, while also having it ready for when the central Orb spawns. Just be aware that as you can’t move, and the ability is fairly predictable, that you should be prepared to cancel-cast it often (by pressing “C” by default).

Black Arrow (Space) - Black Arrow is Jumong’s only form of mobility that doesn’t cost Energy. Granting him an i-frame, allowing him to mitigate all incoming damage during his brief leap, it’s undeniably valuable. Depending on your movement direction will determine where you leap to, but also where you fire your arrow. As the leap on Black Arrow is so small, it’s imperative that you not only land the arrow when leaping, but also move in the right direction. When under heavy melee pressure, you typically want to leap backwards. What’s particularly strong about Black Arrow is the fact it can be used twice when Jumong’s bow is fully charged, allowing him to then leap a great distance. The double-leap not only creates a lot of space, but also permits Jumong to fire back-to-back arrows as he dances around opponents. Against Champions such as Raigon or Freya, saving a double cast of Black Arrow is fairly mandatory.

Rain of Arrows (Q) - Rain of Arrows is arguably one of Jumong’s strongest abilities as it allows him to not only zone the enemy (especially with a double cast) but to also slow them. Whether cast on yourself when under melee pressure, or on the central Orb to snag it when the enemy aren’t watching, Rain of Arrows is vital. Ideally you want to cast it when you can hit an opponent, rather than just to zone. However, if casting Rain of Arrows to force the enemy back allows you to secure the Orb, it’s worth it. With Rain of Arrows slowing enemies inside, you should try to always have a line of sight to those in its radius. Those slowed are easy pickings for your Steady Shot, or to follow up with a root from Bear Trap. Lastly, don’t be afraid to quickly stack two Rain of Arrows’ when your bow is fully charged. Cast twice, the ability can cover a huge area and affect multiple targets: remember those struck first are afflicted with Seeker’s Mark.

Bear Trap (E) - Bear Trap takes some getting used to, especially when under heavy pressure. While its zoning potential is amazing, it’s the root that makes it so strong. It not only locks down a player for a considerable period of time, but also allows Jumong to land Steady Shot if he casts it the moment his trap is thrown. Ideally you want to be snagging a player instantly with Bear Trap, rather than attempting to zone them. By all means lay it down and work around it, just don’t expect skilled players to walk immediately into it. Learning to bomb a player instantly with a Bear Trap, for a quick Root is often key to surviving or bursting an enemy down.

Prowl (R) - Prowl is probably your most important ability, on the basis that it offers Jumong a near guaranteed means of escape. The movement speed increase combined with its immaterial - alongside CC removal - ensures you can zip away from just about every opponent. While the duration of Prowl isn’t long, it’s often long enough to find cover or wait for cooldowns to refresh. What’s particularly powerful about Prowl is the fact you can inflict Seeker’s Mark on any enemies you pass through, allowing you to gain at least 12 health the moment you reappear (as long as you can land your shots). My best advice for Prowl is to not only save it for those, “Oh, shit!” moments. Black Arrow and Bear Trap can get you out of a lot of problems, so saving Prowl for when you’re under serious, unavoidable pressure is a must.
EX Abilities (Arena Only)

Guided Arrow (Shift + LMB) - Guided Arrow allows Jumong to inflict Seekers Mark on multiple targets, while gaining 6 health per target hit. Your arrow, when fired, will ricochet between nearby Champions, debuffing them and restoring health instantly. Guided Arrow offers amazing sustain for Jumong and whether trading 1 on 1 or attacking multiple foes, can keep your health topped up with relative ease. Unsurprisingly, a key component of truly maximizing your damage potential and health return is then landing your attacks to consume Seeker’s Mark.

Seekers Arrow (Shift + RMB) - Seekers Arrow is the reverse of Guided, and allows Jumong to instantly fire a high damage shot that ricochets between multiple targets. Against a single foe, it will bounce and cause a total of 36 damage to a single foe. When used against more than one, the damage is split equally amongst them, up to a maximum of 3 targets. Used 1 on 1, the instant cast of Seekers Arrow combined with the fact it follows a target can work very well with Bear Trap. The ability also works very well against the central Orb, or to soften up multiple foes who are close together. Seekers Arrow is also paired with Guided, allowing you to instantly consume multiple enemy Champions who are suffering Seeker's Mark.
Ultimate Ability

Dragon Slayer (F) - Dragon Slayer is a challenging ability to use. It’s easily avoided, it’s incredibly obvious and it leaves Jumong stationary while casting. Considering its range potential however, and the fact the distance your arrow can travel increases the longer you hold the ability down, there’s play potential here. With Dragon Slayer pinning and dragging Champions caught in its grip, a quick cast can still be as powerful as one held. Ideally you want to use it from maximum distance for maximum damage, and preferably when the enemy aren’t anticipating it. Just be prepared to cancel-cast against a counter heavy composition.
Battlerites (Arena Only)

Death Mark
Jumong relies heavily on Seekers Mark, so having it deal 4 additional damage when you consume it can be fairly significant. With many of your abilities causing its effect, Death Mark is a potent damage boost.
Arrow Storm
Arrow Storm is excellent for not only increasing the zoning threat of Rain of Arrows, but for also snagging an Orb easier. The increased damage and radius allows you to pressure multiple targets easier, while it also plays into your Deadly Trap Battlerite (below)
Trapper
Trapper provides Jumong with an additional Bear Trap in front of the first he casts. For snagging multiple enemies, it's amazing at allowing Jumong to zone, without having to be entirely accurate with Bear Trap.
Deadly Trap
Allowing Jumong to gain bonus damage for anyone caught in Bear Trap (+4 for each projectile he casts against those caught), Deadly Trap pairs into Death Mark and can quickly allow Jumong to gain at least +8 damage just from a single Seekers Mark > Bear Trap > Hunting Arrow rotation.
Perfect Shot
Perfect Shot allows Steady Shot to briefly stun anyone hit, granting Jumong the opportunity to land an additonal Hunting Arrow, throw a quick Bear Trap or to simply retreat. It also means your team can follow in, punishing whomever you land your Steady Shot on.
Matchups
These Hero Threat Levels (1 being lowest threat and 10 being highest threat) are to help you determine which enemy Heroes can give you a headache. For the Heroes listed here, take extra care as they're particularly dangerous for Jumong.
Hero
Threat
Croak: His mobility and invisbility will always cause you problems. Unless you have Focus to use Prowl and Guided Arrow, you're in trouble. 8/10 Freya: Because she's so mobile, alongside plenty of counters, she can pull you in and punish you easily. 8/10Ezmo: His speed, rapid attacks, ability to shield himself and his long ranged poke makes him a headache to avoid if he dives you.
8/10 Raigon: A well skilled Raigon can be fairly relentless, even if you manage to use Prowl and Black Arrow back to back. 9/10 Shifu: A good Shifu will always be challenging, especially because of his burst, Counter and invulnerability. You need plenty of Energy to stand any chance of survival. 7/10 Taya: Her mobility combined with i-frames allows her to constantly harrass you with relative ease. Her Haste also makes her hard to hit. 8/10 Thorn: His pull and dive potential makes him a real headache. Even if you escape, it's not long until he can return onto you (while still attacking from afar). 8/10Tips
1. It's incredibly important to reliably land your basic attacks against enemy Champions. Jumong needs his bow fully charged in order to maximize his ability use. Missing constantly not only harms his potential damage, but also his utility and survivability. Practice against AI or Quick Play to ensure you don't miss regularly.
2. Just because you have a fully charged bow doesn't mean you have to use the double-abilities it affords. Typically, you'll want double Steady Shot for burst, Rain of Arrows for reliable pressure and Black Arrow to evade, or finish off a low health Champion.
3. Steady Shot deals high single target damage and can steal the central Orb near instantly once it's below 30 health. Try to always have Steady Shot available for when it spawns.
4. Steady Shot has a fairly obvious animation: it's easily interrupted and predicted. Don't forget to cancel cast to bait enemies into using their abilities.
5. You can reliably land Steady Shot against a Champion caught in your Bear Trap as long as you cast the ability the moment they're rooted.
6. Despite offering an evasion, Black Arrow only allows Jumong to travel a very short distance. Use it to zip back to team mates, evade a key ability or find scenary. Most melee Champions can be on you almost immediately after, so don't leave yourself vulnerable.
7. Black Arrow always fires an arrow in the direction of your mouse pointer. Want to fire at an enemy in front of you? Be sure to aim at them when you trigger the ability.
8. Rain of Arrows deals high AOE damage, while snaring and applying Seeker's Mark to anyone in the area. Whether you need to zone the enemy, regain some health or simply pressure a group, it's a powerful ability.
9. Try to use Rain of Arrows in confined spaces, or over yourself (or the Energy Rune). This can often zone enemies away, or ensure they take high amounts of damage.
10. The snare component of Rain of Arrows is ideal for landing several basic attacks against a target.
11. Don't just randomly use your Bear Trap. Its root is imperative for Jumong's survival, but to also burst down enemy Champions. Try to throw it at a Champion so they're instantly caught.
12. If you've thrown a Bear Trap down, try to fight around it. You want enemies to trigger it, or back away for fear of being rooted.
13. Prowl is invaluable for Jumong as it grants a 100% movement speed increase. Use this to run away, or reposition back with your team. If you play aggressively with it, you need to ensure you won't take a beating (its cooldown is fairly long).
14. Prowl is great for personal sustain. Inflicting Seeker's Mark on an opponent you run through can instantly afford you health, while a follow up of Guided Arrow can heal you for even more.
15. Guided Arrow is good 1 on 1, but it's even better against a group (especially in 3 v 3). Try to tag as many Champions as possible, before following up with Seeker's Arrow for maximum damage.
16. Seeker's Arrow fires instantly and can ricochet against one Champion 3 times. It's fantastic for an instant burst of damage on the move.
17. Be sure to cancel-cast Dragon Slayer if you won't hit anyone. It costs too much Energy to waste, and will leave you with the ability to use Prowl afterwards.
To read the latest guides, news, and features you can visit our Battlerite Game Page.
