


Overview
Aisling is an incredibly powerful and flexible Hero that utilises her father's ghost and sword as a means of attacking enemies. She can project Cador to a specific location and once he's travelled there, he's capable of dealing damage or when upgraded, forming a protective barrier. Aisling is also able to recall Cador to significantly buff her melee abilities. She's formidable in the right hands and once she levels up through the course of a match, can provide incredible utility for her team as well as minor healing. Aisling is more than capable of killing most Hero's one on one, but she is incredibly weak if Cador dies. As such, you need to not only manage his movements effectively, but also your own. I will also add that Aisling is very much a "pet" class.
Guide Updated: 1 February 2016
Pros
Cons
A brilliant brawler when paired with a Support Hero or The Margrave
Managing Cador effectively can take some practice
Powerful utility from Cador when he's upgraded
If Cador dies you're incredibly weak
Can survive against most enemy Hero's
It can be challenging to kill ranged enemies such as Charnok or Voden
Cador offers strong early poke
She relies on upgrades to gain any mobility
Into the Blade significantly boosts your damage
Her ranged options are..."meh".
An useful Focus which can easily disrupt enemies
Skills
This section of our guide contains a list of Aisling skills, what they do, which upgrades you should choose (and when) as well as what those upgrades are for.
Base Skills

Slash does what it says on the tin. It allows Aisling to swing her sword in an arc in front of her. By default, it will only hit one target at a time and its animation chain is somewhat lengthy. Despite that, it hits hard and you should use it constantly.

Cador's Charge allows Aisling to instruct Cador to move to a location and when he arrives, he'll attack the nearest target. This is your primary poke ability and allows you to engage early before following up with Slash. Use this to move Cador as often as possible as the cooldown is very short (3 seconds).

Cador's War Cry allows you to command Cador to interrupt nearby enemies. Cador will use the effect around himself, meaning you have to direct him to the location you want the interrupt, by commanding him with your RMB. It takes around 1 second for the interrupt to trigger so be sure to project Cador just in front of your intended target.

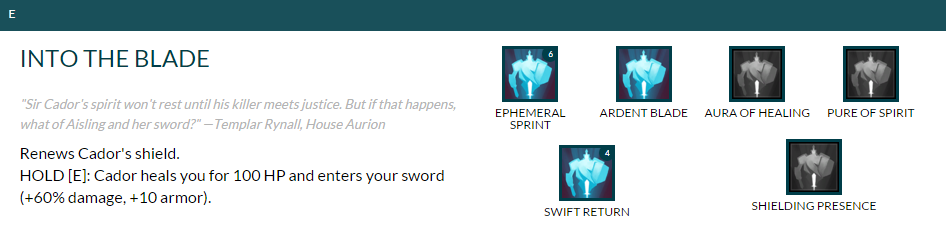
Into The Blade will renew Cador's shield regardless of where he is. It's incredibly important that you regularly replenish his shield so that you can keep him alive as long as possible. If he's about to die, you can always hold E to summon him back into your sword - you'll gain additional damage and armor and won't be punished for his death.

Terrify will launch enemies near Aisling, as well as slow and weaken them. If used alongside another Heroes such as Griselma's, the enemy team is going to die very quickly.
Skill Upgrade Paths and Order
Below is the upgrade path I would recommend for each skill. The numbers below on each image correspond to when you should upgrade that individual skill, and for ease it's listed below in order. This build order is important as similarly to my build principal with other Hero's, it's important to gain survivability early before ramping up your damage and utility mid to late game.
Level 2: Father's Lesson (LMB)
Level 3: Cador's Charge (RMB)
Level 4: Swift Return (E)
Level 5: Father's Reproof (LMB)
Level 6: Ephemeral Sprint (E)
Level 7: Chastise (Q)
Level 8: Dread (Q)
Level 9: Fast Recharge (RMB)
Level 10: Night Invulnerable (Focus)
View the full build here.

Father's Lessons allows Aisling's Slash to deal damage to up to three targets. Although you'll rarely find a group of enemy Hero's close enough to see any real gains, it's useful for killing Griselma's hands or just quickly cleaving if an enemy group comes together when your team uses a Focus skill on them. Father's Reproof is what you're really after as it allows Aisling to cause weakness to the enemy target, reducing their damage output by 25%. This works well when hitting multiple targets as it means you can weaken several foes at once.

Cador's Charge allows him to land a powerful attack when he arrives at his location. It's an important damage spike and ramps up significantly when you take Fast Recharge. With Fast Recharge, Cador will swing once every 3 seconds. During team fights when you don't need to recall him, it's effectively free damage during the period.
Variable: If you're constantly using Into the Blade, Burning Blade is a good option. Once Cador uses his charge, he'll burn the enemy target. You can then summon him Into the Blade and proceed to deal damage. It's a good damage bump.

Chastise allows Cador to slow enemies when you use his War Cry. The significance of this is that it makes it so much easier to land your Slash and for your team to focus your target. Taking Dread builds on this even further and causes Cador to cripple those in his War Cry. The Cripple reduces movement speed even further to the point where anyone affected, really isn't going to escape.
Aisling isn't a squishy Hero but she can be focused easily if she's out of stamina. Swift Return allows you to gain 25% movement speed on holding E and also grants 10 stamina. It pretty much allows you to outrun anyone. Combined with Ephemeral Sprint, you also turn invisible for 4 seconds. It's pretty ridiculous - especially with the stamina gain as you can cover half of the Canyon map before you turn visible again. I absolutely adore it and it's incredibly for stealing Power Orbs, going for Wound or running rings around an enemy Hero when fighting them 1 on 1.

Being able to use Terrify whilst taking almost no damage is incredible and allows you to rush into a fight (preferrably after you've sent Cador in) to cause a huge upset. Using Nigh Invulnerable you can then stick around dealing damage, without fear of dying.
Talents

Level 3: Angular Momentum
As Aisling you'll regularly be strafing around your enemy when hitting them with your sword. If you use Into The Blade, you'll also move quicker, meaning you can really maximize the use of Angular Momentum and the 15% damage boost.
Level 5: Ghostly Might
Summoning Cador Into The Blade is invaluable at boosting your damage. Considering Into The Blade already boosts your damage by 60%, adding a further 20% makes things slightly ridiculous. Ghostly Might is a must.
Level 7: Calling the Shots
Debuffing enemies with Calling the Shots provides you and your team with a 10% damage boost. You can achieve this with Father's Reproof so it's fairly easy to keep it up near permanently when in combat.
Level 9: Hero's Might
Similarly to Calling the Shots, Hero's Might provides a flat 10% damage boost to Aisling. You can maintain the 20% boost full time across both talents (including Calling the Shots) as long as you're actively using your skills.
Threat
This section of our guide contains a list of tactics for fighting against other Hero's with Aisling. Please note that only the Heroes that are the highest risk and threat to Aisling are included in this list.

Charnok will always be a threat to Aisling simply because he deals so much damage. A well placed Hot Hail, LMB and dive bomb from his Q is enough to serious hurt you. Despite that, Aisling usually has the upper hand. You can send Cador in early, slow him and when you arrive, summon Cador Into the Blade. You can then sprint around Charnok dealing huge damage while weakening him. He'll no doubt use his Flame Breath but you can usually avoid it due to your speed.
Threat: 6/10

Griselma is fairly tough for Aisling but only if she has all 3 hands available. If she does and has taken the armor break upgrade line on her Portal Beast's, you're going to take a lot of damage. Even if you send Cador in, she can still hit past him due to her beam-based attacks. Just focus Griselma and ignore her Portal Beast's. If she has grouped them together, cleave them down using Cador and Slash before turning your attention back onto her.
Threat: 6/10

Imani is always going to be a threat to Aisling simply because of her damage and range. If she catches you out in the open, you're going to take some damage - especially if Into the Blade is on cooldown. If it isn't, just use it and stealth up to her. Once you arrive, use Cador to slow her and keep swinging away even if she turns invisible. You can usually snag her.
Threat: 6/10

Knossos is the biggest threat to Aisling. His mobility, slow, knockdown and raw damage mean he can eat you alive in seconds, even if you weaken him. If you can, try to avoid situtations where you're 1 on 1 and instead attack him when there are others around.
Threat: 9/10

Wu is hit and miss. A well skilled Wu can lock you down pretty heavily if he takes the cooldown reset on Tongue Lash. Combined with his armor from Focus and Flowing Fist, he can also take a beating. Fortunately for you your weakness from Father's Lessons really helps here. Try to dodge his Tongue Lash and trigger Into the Blade after. He can't withstand it for long.
Threat: 7/10

Xenobia’s a headache for Aisling simply because of the fact her Cripple and Armor Break are so strong. Combined with her weakness, knockback and slow AOE (that also causes burning) she really can cause you problems. Try to rush her, and use Into the Blade and the speed it gives to dodge her Words of Spite. If you can, you're in a much better position.
Threat: 8/10
Tips
This section of our guide contains a list of tips and tricks we think will help your Aisling play. We'll continue to add to the list as required and if you have any tips you'd like to share, let us know in the comments below and we'll place them here.
1. Always keep an eye on Cador to make sure he doesn't die. Use your RMB to reposition him regularly.
2. Don't send Cador into combat against a big group of enemies as he'll likely die and give you a big cooldown - even with his shield. Try to poke when it's a fight you know you can recall him from.
3. Use Cador to body block for you as his hit box is bigger than yours. He's a great barrier.
4. When you use your Focus, you can cast it upon yourself and Cador (it stacks). Try to use it when Cador is out to deal huge damage.
5. If your Cador is far away from you, and you right click somewhere the travel time will be long. Use your Into the Blade to speed up the process as Cador moves fastest when appearing from your sword.
6. Ensure that when you're fighting an enemy that you don't use Into the Blade too early. It'll leave Cador vulnerable or you without an escape skill.
7. Remeber that Cador deals burning damage when upgraded. Try to maximise this in group fights by sending him into the middle, before recalling him.
8. E will replenish Cadors shield - you should use it as much as possible, as long as you aren't in danger of being focused.
9. If you can, try to use Cador's Command when you're in melee range so that you can make use of Father's Flame.
10. You should be constantly instructing Cador where to move as his movement is limited by your instructions on who he should attack.
11. Cador's War Cry no longer moves Cador, instead it activates based on where he is. Try to use it immediately after Cador's Command or when he's already amongst enemies.
Ten Ton Hammer would like to thank GGUnleashed for their awesome Gigantic Skill Calculator!
To read the latest guides, news, and features you can visit our Gigantic Game Page.
