
Trading is the perfect compliment to all of your in-game activities in Naval Action. If you enjoy combat or conquest, trading can help you buy the best possible ships for your rank. If you enjoy crafting, trading will help you find much cheaper raw materials than may be otherwise available in your crafting outpost.
A warning, though. If you view trading as a get rich quick scheme, you can lose a lot of time and money through bad trades and lost cargo. Just like in the real world, if you take the time to research and establish your commerce, pay attention to buying and selling prices, and make smart, patient decisions on what to buy and sell, you can be richly rewarded for your efforts.

Rank up and earn some working capital
Trading is a potentially risky and time consuming enterprise, so if you're just starting out, do missions to make money and rank up a bit. Missions help you learn the finer points of fighting and sailing well before mistakes become costly. Plus, you should gain some comfort with navigating via the compass while sailing out of sight of land, since the game won't track your location on the map.
One note if you plan to solo trade: don't level past 4th rank without hiring a fleet of AI cutters. These hirelings are your scapegoats - they can help dissuade an attack or soak up damage while you sail away. Past 4th rank you cannot hire any more ships, but can use the ones you've hired.
Explore and Gather Intel
So, once you have enough spare gold to buy the permit and build a second outpost (around 25k), carve yourself out an evening to take your basic cutter and explore some out-of-the-way trading routes.
Look at the shop every time you're in port and try to get a sense of what prices are. Apart from player interaction via contracts, prices tend to remain fairly fixed over time. When you find a cluster of ports that seem to rely on each other, plunk down an outpost. Note that you can teleport to an outpost from any port with an outpost, but you can't bring your ship to an outpost other than your home port.
As far as This is where my OCD nature comes out to play, so if keeping notes on a game feels too much like work, please skip the rest of this section.
Some players have a head for prices. I don't. So if you're like me, keep a log of some sort. I'd recommend tracking the following, grouped by port cluster (ports in reasonable range of each other):
- What a port produces and consumes - Assuming no player interaction, this determines what's cheap to buy and profitable to sell at a port. Specific goods a port produces and consumes tend to have much more stable prices than other goods. Note that these do not change from day to day, but may change after patches.
- Buy and sell prices - Granted these can change drastically in the course of a day, but you'll generally find that prices stay somewhat stable over time. It's good to have a record of what you can find where and for what price.
- Minimum buy and maximum sell prices in a port cluster - If you're keeping track in a spreadsheet (as I ashamedly do), this is a simple formula. Subtract the values to find the profit margin.
- Distance - The hidden currency in all of trading is time, so trades that might make sense on a 15 minute round trip may not make sense over an hour. Either develop a geographic sense of the time a trade might take or use a tool such as burningsail.com to chart a course, develop a table, and divide the profit by the exact distance. You might be surprised to find that a short voyage with a lot of coal is worth more than a long voyage with an affordable amount of compass wood.
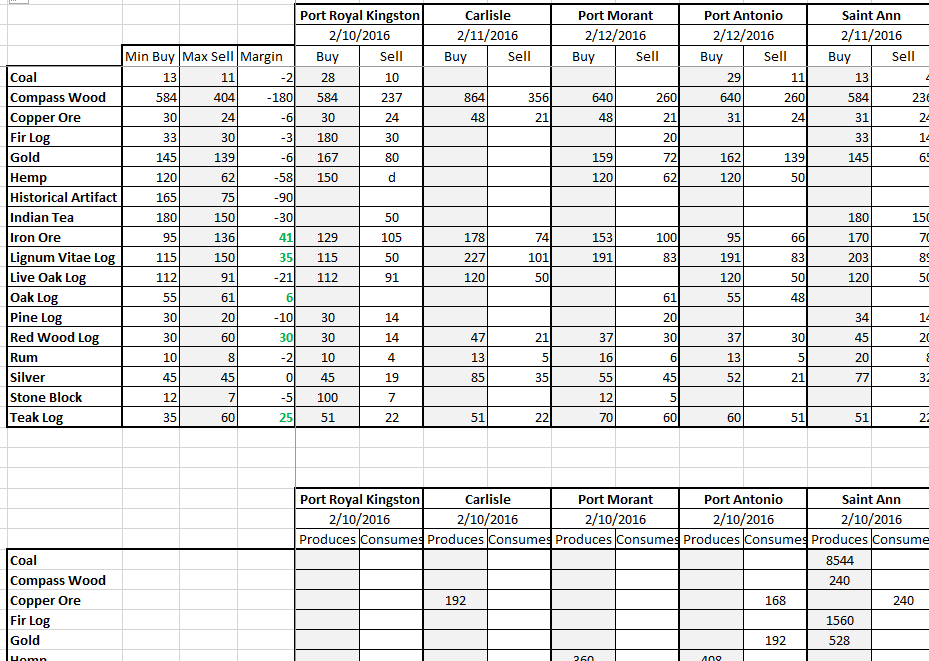
Here's a look at the spreadsheet I use:
Capturing a Trader
Until (or unless) you want to hire a fleet, speed is your primary advantage. You should learn enough about sailing to capture an NPC trader. These are commonly found in home waters (note that friendly ships carrying contraband are fair game and won't turn you into a pirate), and even more plentiful around freeports. Plus, it's much cheaper to capture a trader than to buy one, assuming you can find one to buy.
Trader's brigs and snows make good targets, being square-rigged and able to sail better close to the wind (not to mention holding 2400 (Trader's Brig) or 3200 (Trader's Snow) units a piece). Be advised that trading brigs typically carry rear carronades that can tear you up at close range, and trading snows have a few cannons on their broadsides.
These ships will only have a durability of 1 upon capture, meaning you'll lose them upon sinking or capture. They're plentiful, however, and in that extremity you'll probably hate losing the cargo (which you'd lose anyway) much more than the ship.
The usual capture routine versus AI is to...
- Reduce their sail with chain to 70% or 80%. This makes the ship much slower and easier to ram or "sideswipe" and board later.
- Weave through their wake, eliminating their stern armor with ball shot
- Use grapeshot between sail and hull to reduce crew until you outnumber their crew by about four to one.
- At that point, you can pull aside or ram the trader to a standstill, board, and easily carry your prize.
Send the trader to your outpost. In fact, send a few if you have the time and don't need the blueprints for crafting (otherwise make like a pretty girl and break up). You can teleport spares back to your home port full of stockpiled goodies for sale, then either sail it back or break it apart for parts (if you're a crafter or in league with one).
Outfitting and sailing your trader
Speed is super important for your trader for two reasons: 1) it lessens the amount of time you'll spend in transit (even fractional increases in speed add up to a lot of time saved), and 2) you'll probably have to outsail an attacker at some point.
Eventually you'll want to keep a player-crafted trader's brig or (even better) trader's snow that's been built for speed in your outposts, but for now, either craft or buy a cheap copper plating and/or speed trim upgrade. I remove the cannons and carronades from my captured traders for a nominal increase to speed. Even small incremental increases in speed can save you hours over the life of the ship.
As far as sailing your trader, there's one rule: AVOID the temptation to go AFK for any length of time on the PVP servers. No matter how safe the sea route, you can stumble across another player in a matter of minutes. And an AFK trader is usually too juicy a target to pass up.
Opportunistic Trades: Selling to Players
Your capital is probably a crafting hub, meaning it's a terrible place to buy resources but an excellent place to sell to players.
Crafters (especially beginners) tend to need enormous quantities of the following goods for levelling (in order of need):
- Fir Log
- Coal & Iron Ore
- Oak Log
- Hemp
- Stone Block
Outages of any of these goods constitute good opportunities to sell stockpiled goods via contract and to provide a welcome service to your fellow captains.
That said, there are some unspoken rules to home port trading...
- Don't monopolize resources. It's OK and even advisable to stockpile goods captured from prizes or sourced from other ports, but avoid buying up enormous piles of goods from your home port.
- Being overly greedy will get you nowhere. The standard merchant markup is 50% over cost (to cover the cost of time and contracts), but go much lower if you can. You'll be helping to stabilize the local economy and save your crafters' time while turning a tidy little profit.
- Remember that crafters are likely traders too and can easily source the materials themselves. They'll pay a reasonable markup to avoid the inconvenience, but if you ask for too much you'll be left with only your original stack of materials and your contract costs.
Another good tip, especially if you can't afford to have money tied up in inventory, is to watch your nation or clan chat for prolific crafters and set up ongoing deals with them. Offer them a little below what you'd sell on the open market - you can always sell there if things fall through. Over time you might form a partnership that could result in discounts on purchased ships.
Trading for Steady Income: Outpost Trading
If your nation's population is robust, you're likely not going to find many steady open market trading opportunities around your home port. Player density minimizes opportunites, plus it's too easy to take advantage of teleport to sell goods in and around the capital.
The ideal trading route is as follows, in order of necessity:
- Port A produces something Port B consumes, even better if vice versa.
- Port A and B are reasonably close to each other - 30 minutes sail or less.
- Transit between A and B doesn't go through (or close to) the home waters of any nation besides yours.
- Port A or B is or near a freetown, meaning it can't be captured and is an ideal place to set up an outpost to house trading ships and stockpile goods for sale when sell prices aren't good.
- Either Port A or Port B (or both) has/have a reasonable substitute nearby, in case another trader crashes your markets occasionally.
This scenario is obviously pretty rare, both due to game planning and the fact that a friendly, capturable port that's part of this chain is liable to conquest. You might have to chain another port or travel a little farther than you'd like, but it's good to know what you're looking for.
As for what goods should be produced and consumed, I'd recommend sticking to cheaper goods like coal, iron ore, copper ore, fir, and oak at first. If you make a mistake speculating on the more expensive woods and precious metals, it's much more painful than if you make the same mistake with something relatively cheap.
Stockpiling Goods
Historical Artifacts and National Goods (goods available only within a handful of a nation's starting ports) are excellent goods to stockpile. You can teleport a trader-full of these goods home when you have a trader to spare. The markets for these goods are essentially bottomless and will never interfere with player crafting.
National goods are as follows:
- Indian Tea - Great Britain
- French Wine - France
- American Cotton - United States
- Batavian Spices - Verenigde Provincien
- Danish Beer - Danmark-Norge
- Iberian Meat - Espana
- Swedish Iron - Sverige
Always buy and stockpile your national good in your home port when it's available at base price. You can either sell it in a friendly or neutral port, set up contracts in a free port, or even set up trading agreements via chat with traders from other nations.
That last option is potentially the most profitable and fun, but be sure to use stockpiled goods in freeport outposts - don't sail into a freeport for a prearranged meeting especially if you've used public chat channels to arrange the meeting.
Trade!
The rules of trading are simple: buy low and sell high, preferably well away from other traders and hostile nations. If you've read everything up to this point, you're more than ready to make some decent trades.
Again, don't sail while hard AFK for long, but it's a nice, relaxing activity to do via laptop while watching TV or reading a book. Also, remember that markets strive for equilibrium - the more you sell, the lower the price you'll get. It follows a linear curve, so the midpoint of your sell orders minus the midpoint of your sell orders multiplied by the number of lots equals your profit. If things turn unfavorable, either stick to lower volume trades or stockpile goods in outposts until the market recovers.
If you have more trading advice, please don't hesitate to share in the comments. Happy trading!
To read the latest guides, news, and features you can visit our Naval Action Game Page.
