


Heroes of the Storm: Raynor Build Guide
In this Raynor Build Guide, we provide an overview of his strengths, abilities and talents.
Quick Nav
Overview
Raynor is a ranged Assassin that is capable of dealing massive sustained basic attack damage from afar. He has a fairly low skill floor, allowing any player to pick him up and do fairly well. While anyone can pick him up and do alright, he still takes some proper positioning and timings to play him to his maximum effectiveness.
Stay at the back and try to fight teamfights front to back, meaning just hit whoever is in front of you unless your tanks sets up an easy kill, as it is very likely that Raynor can out damage the enemy team due to his high sustained damage. If enemies try to jump on him he can use Penetrating Round to push them back or heal with Adrenaline Rush.
Pros
Cons
Low skill floor (easy to pick up and play)
Low mobility
Fairly tanky due to his health pool and Adrenaline Rush
Can be quickly bursted in CC if he cannot use Adrenaline Rush
He has a powerful knockback that can disrupt many heroes or peel
Raynor's Raider requires a ton of micro to use properly
Very high sustained damage
low wave clear
Trait

Give 'Em Some Pepper (Trait) – Allowing Raynor to deal a spike of damage on his 4th shot, Give Em' Some Pepper also splashes to those around your primary target, dealing normal attack damage. This extra burst of damage is very strong and forces enemies to keep track of your auto attacks.
Abilities
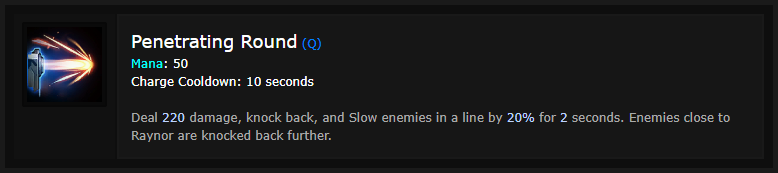
Penetrating Round (Q) – Penetrating Round deals strong damage and knocks enemies back, with closer enemies being knocked back farther. This is your only way to peel, so be careful using it for the damage. Don't be afraid to use it to secure a kill on a low health target but also keep in mind the knockback as you do not want to knock enemies to safety.

Inspire (W) – Inspire increases Raynor's attack speed and movement speed briefly. The increased attack and movement speed allow you to out-trade almost every hero. The auto attack reset is huge and allows you to shoot two auto attacks almost instantly, allowing Raynor to have some significant burst if timed properly. Hitting this ability as often as possible to reset your auto attack timer will allow you to apply some very strong pressure to enemies.

Adrenaline Rush (E) – Adrenaline Rush gives Raynor an option to heal for 25% of his maximum health over 1 second. This heal will make it very difficult for enemies to kill you when they commit. Try to avoid using it for sustain unless your healer is being overwhelmed by the enemy team's damage as once it is on its very long cooldown, enemies are much more likely to burst you down.

Hyperion (R) – While the damage of Hyperion isn’t huge, it does last 12 seconds, dealing considerable damage if enemies soak it for its full duration. If they choose to avoid it you can use it to zone a very large area, allowing your team to gain a strong position or force enemies into a choke.

Raynor’s Raider (R) – Raynor's Raider summons a Banshee that follows Raynor. This banshee lasts forever but has a 45 seconds respawn timer when it dies. Pressing R will give the Banshee a command to move to a location or attack an enemy. It can clear the way in front of you, checking bushes and other places where enemies may hid, making it near impossible for them to surprise you when you rotate. When a fight happens it can add some significant DPS to your targets or pressure the enemy backline. Just keep in mind that it has very little health but can regenerate if it had not taken damage recently.
Talents

Level 1: Ace in the Hole
Ace in the Hole allows Raynor to deal 10% more damage to enemy heroes that are slowed or stunned as well as causes Give 'Em Some Pepper to slow by 10% for 2.5 seconds. This affects not only his auto attacks but also all of his abilities as well. This just adds some extra consistent damage.
Level 4: Behemoth Armor
Behemoth Armor grants Raynor additional maximum health and even more whenever he hits an enemy hero with Give 'Em Some Pepper. This makes it even more difficult for enemies to burst you even if they CC you. If you are not CCed, Adrenaline Rush will heal for even more due to your increased maximum health.
Level 7: Unstable Compound
Unstable Compound increases the AoE of Give 'Em Some Pepper as well as causes it to grant 10 mana and reduce the cooldowns of Penetrating Round and Inspire by 1 second per enemy hero hit by Give 'Em Some Pepper. This adds some extra DPS over a longer fight as you will have Inspire active more often as well as increasing your survivability through the reduced cooldown of Penetrating Round.
Level 10: Raynor's Raider
Incredibly annoying to fight against, Raynor's Raider can deal consistent damage to a single target and will continue to follow them during its duration. It is great for checking bushes to allow your team to rotate safely or simply find enemies. It lasts indefinitely if it's not destroyed, and deals a good amount of damage. In fights, it can zone out an enemy player or boost your damage massively.
Level 13: Giddy-Up
Increasing Raynor's movement and mounted speed by 8%, Giddy-Up allows Raynor to move around the map or teamfights much easier, making him even more difficult to lock down and kill.
Level 16: Paint them Red
Paint them Red grants Raynor's Penetrating Round 50% increased damage and also heals him for 90% of the damage it deals to enemy heroes. This allows Penetrating Round to deal incredible damage, giving Raynor some burst on top of his very strong sustained damage. It also makes Raynor even harder to kill, giving him a massive heal on demand.
Level 20: Execute
Execute increases Raynor's attack speed by 20%, and increases his auto attack damage by 25% against targets below 50% health. This increases Raynor's damage significantly, especially against low health targets. Keep in mind that the 25% increased damage to enemies below 50% is not limited to heroes and will proc on all enemies including, minions, mercenaries, and buildings.
Matchups
These Hero Threat Levels (1 being lowest threat and 10 being highest threat) are to help you determine which enemy Heroes can give you a headache. Any Heroes that aren't on this list are easy pickings for Raynor. If a Hero is listed here, take greater care.
Hero
Threat
Cassia: Her blind and physical armor can be a pain but you outrange her by 2 range, allowing you to easily kite her. 6/10Illidan: His mobility combined with his shielding/evasion make him a real nuisance. Knock him back after he uses both Dive and Sweeping Strike to leave him in a very awkward position.
6/10
Johanna: Johanna's threat to Raynor is her blind, and ability to shrug off his knockback with her Trait. She can keep you back but has no real way to ever close the distance between you. Stay back and pressure her until she has to retreat. 6/10Arthas: Similarly to Johanna, He can be a pain if he gets on top of you. With that said, he should have a very difficult time reaching you with your excellent range and knockback.
6/10
The Butcher: His charge can be deadly if it means his team can close the distance and follow up. Stay back in the fights until he charges and then blow him up if he runs too deep or charges anyone but you.
6/10
Tips
This list of tips and tricks are just a handful of things we think will help your Raynor play. We'll continue to add to the list as required and if you have any tips you'd like to share, let us know in the comments below and we'll place them here.
1. It's incredibly important as Raynor that you use your range to your advantage. You can attack from further away than most enemy players. Use this to pressure high value targets or stay safe while still dealing damage.
2. Try to position yourself so that you are near the back of any team fight. Force enemies to wade through your whole team to reach you.
3. While following up your team's CC is crucial when they look for a kill. Don't be afraid to hit anyone in front of you before the fight erupts. If you can pressure the enemy tanks enough, they will have to retreat.
4. Penetrating Round can be great to peel enemies off of you or allies but is also a great ability for some extra damage if you do not need the peel.
5. Always use Inspire as often as possible. It provides a large burst of two instant auto attacks and a significant attack speed boost.
6. Remember that you have control over your heal and when to trigger it. Just don't leave it too late, as it does heal over 1 second.
7. With your Banshee remember to control it with R to move it out of harms way or attack the correct enemy.
8. Your Banshee will always regain health over time when not taking damage. Be sure to keep it alive as much as possible.
To read the latest guides, news, and features you can visit our Heroes of the Storm Game Page.
