


Overview
Pestilus falls somewhere between Blossom and Zander, in the sense that he uses his Hive to zone (similarly to how Blossom utilises her Tree of Life) while he can continually heal (just as Zander can). The difference between all three, however, is the fact that Pestilus is all about control through the use of Panic. Both his Hive and Arachnophobia can cause it, while he also gains significant mitigation thanks to Infect (which makes him immune to all damage) and Swarm (which he can also cast on his allies).
Pestilus is the head priest of Quna. He serves the Qunan royal family, but secretly worships an evil deity, Rasal. His schemes manipulated the king into exiling the crown prince. In the arena, Pestilus unleashes swarms of insects to infest and cripple his enemies, releasing his innermost darkest desires.
While Pestilus is undoubtedly strong in the right hands, he requires skilled play and is much less forgiving than the likes of Pearl or Ulric. If his Queen is placed badly, it can be killed quickly leave him vulnerable, while a missed panic can spell disaster if he miss-times his Infect. That said, if he reliably places his Queen in the right spot, not only can it keep him and his team alive for lengthy periods, but it also acts as an amazing zoning tool. While I’d argue Pestilus is a touch stronger in 2’s and 3’s, he can fit into just about any composition.
Updated: 25 September 2018
Pros
Cons
Amazing zoning potential in Hive
Challenging to play
Excellent healing through Moth
If Hive is killed quickly he’s vulnerable
His access to Panic is frustrating to deal with
Miss-use of Infect can see him killed quickly
Infect provides total damage immunity for Pestilus
Arachnophobia can be easily interrupted or avoided
Vomit and Swarm offer solid control/mitigation
No real mobility outside of Infect
Abilities

Moth (LMB) - Moth allows Pestilus to continually heal, or deal damage to a single target. On application, Moth applies a heal or damage over time, depending on who you hit. In addition, Moth also provides Pestilus with a gentle return of healing. Simply put, you should constantly be using Moth on allies and enemies, to maintain the HOT/DOT, but to also pressure and heal where needed. The major downside to Moth is that it requires line of sight, resulting in Pestilus having to position himself perfectly.

Bloodsucker (RMB) - With a low cooldown, Bloodsucker is Pestilus’ primary means of burst healing, or dealing instant high damage. Unfortunately for Pestilus, any damage he deals with Bloodsucker he receives 15 damage in the process. While it can’t kill you, you do have to balance out its use, ensuring that you rotate Bloodsucker and Moth to burst, and keep your health topped up. Lastly, Bloodsucker can be cast instantly on a successful Panic, ensuring you can force a retreat from a foe and still deal damage to them.

Infest (Space) - Infest is your primary means of defence, and allows you to travel inside an enemy or ally. Depending on who you choose determines the value of Infest. Inside an enemy, they take 25% more damage. Inside allies, they take 75% less damage. Depending on who you’re near, or if an ally is under pressure, will largely determine your use of Infest. If you’re by yourself, diving into an enemy will buy you time, give you the opportunity to dart in another direction when exiting, and create space. In contrast, traveling into an ally will ensure they mitigate massive damage, meaning you can heal less (while still recovering cooldowns).

Queen (Q) - Queen is partly the reason why Pestilus is so strong, as it allows him to zone enemies, heal himself and allies, and if it’s killed, cause Panic to all those near. Although it doesn’t have high health (30 by default) it does ensure you can mitigate incoming attacks, and Panic those who burst the Hive. Whether you’re using Queen to body-block, or to simply zone enemies, try to heal it as often as possible to elongate its duration. While it will always eventually explode, you want to maximize its up-time with Moth.
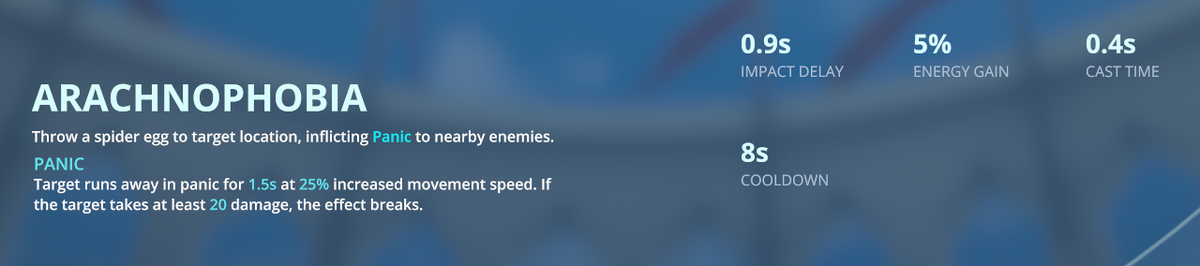
Arachnophobia (E) - Your primary means of defence prior to using Infest, Arachnophobia is an AOE panic that Pestilus throws into the air, before it breaks on landing. Until it breaks, enemies can still attack you and when it lands, it can be avoided. That said, the aerial throw is quick and as long as you aren’t interrupted, ensures you have a significant period of time to escape. Ideally you want to learn to cancel-cast Arachnophobia so that opponents use their interrupts on you, thinking you’re about to use it. This then allows you to free-cast the ability, without it being interrupted.

Swarm (R) - Although you won’t use Swarm all the time, it’s undoubtedly powerful for mitigating a large amount of incoming damage. Allowing you to spread Moth once it detonates, Swarm is valuable when used on an ally in amongst the enemy, or to simply ensure they take less damage if retreating. Mitigating 28 damage, it’s often more than enough to preserve the health of an ally under immediate threat, from attacks such as Jade’s Snipe.
EX Abilities (Arena Only)

Vomit (Shift + RMB) - Without Queen and Infest, Pestilus is vulnerable. In 3’s, he’s particularly challenging to play if you’re up against double-dive compositions. Vomit relieves the pressure on Pestilus, as it allows him to root and knock-back enemies, while applying Moth. Typically you’ll want to use this when other abilities are on cooldown, or to allow your team to burst the Champion affected.
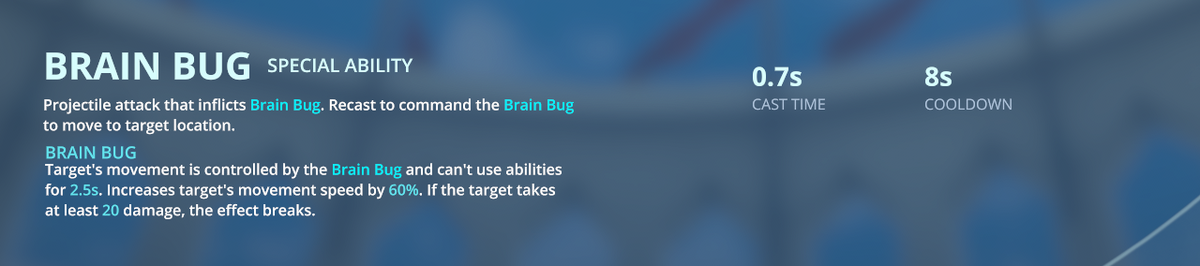
Brain Bug (Shift + E) - Brain Bug is a challenging ability to use, at it needs quick thinking as well as solid positioning. There’s no doubting it’s powerful - especially as the arena begins to shrink. However, Pestilus is vulnerable while using it, as he cannot move while controlling an opposing Champion. You won’t always use Brain Bug, but it does have its moments of value.
Ultimate Ability

Scarab Pack (F) - Scarab Pack allows Pestilus to bombard an area with multiple Scarabs. Each heals an ally, or deals damage to enemies. For each Scarab sent out, Pestilus is always healed for 26, allowing him to keep his health high. Typically Scarab Pack is fairly easy to avoid, and unless you’re already winning or need instant guaranteed burst, it’s often best to use your Energy
Battlerites (Arena Only)
 Hive Mind
Allowing Pestilus to relocate his Queen, not only is this amazing for body-blocking, but also means your Queen can move with you as your fighting location changes. Hive Mind is also fantastic for sending your Queen towards an enemy, just before it explodes, for a targetted Panic.
Disperse
Not always a mandatory Battlerite, but Disperse is undeniably strong when against any melee Champion. The snare, combined with the knockback when inside an enemy Champion ensures they're pushed miles away from you and your team. Disperse is also useful for knocking fleeing enemies back into your team when they think they're safe.
Egg Carrier
Egg Carrier isn't for poking, but instead for a medium to close range double-dose of Panic. Used correctly, you can often trigger two Panics on a single target at once. Use ontop of yourself against a melee Champion, often the second Panic - being larger than the first - will snag your attacker. It's a fairly mandatory talent, that's exceptional with practice.
Spiderling Venom
Allowing you to deal damage with Panic, and increasing its duration, Spiderling Venom pairs exceptionally well with Egg Carrier, ensuring Pestilus can be a nuisance for much longer, while dealing some damage.
Swarm Queen
By default Queen has low health, so having it spawn with a shield ensures it can survive for lengthier periods of time. Swarm Queen makes it easier for Pestilus to keep his Queen alive, while also allowing it to body-block much more.
Matchups
These Hero Threat Levels (1 being lowest threat and 10 being highest threat) are to help you determine which enemy Heroes can give you a headache. For the Heroes listed here, take extra care as they're particularly dangerous for Pestilus.
Hero
Threat
Croak: Purely because he's so mobile, a good Croak will avoid your Aracnophobia with relative ease, while work around your Queen without too much difficulty.
8/10 Ezmo: Fast, mobile and with his very own silence, Ezmo is frustrating to shut down as he can comfortably avoid most of your kit. 8/10 Jumong: His area denial, burst, and bouncing attacks can be annoying as they shut down your Queen. 7/10 Taya: She's incredibly mobile, and almost impossible to land your Panic on when she has haste active. She can stun, cleave and attack around your Queen/ 8/10 Thorn: His pull and dive potential makes him a real headache. He can defend himself easily, while having solid sustain. He can also avoid your Panic relatively easily. 8/10Tips
1. Try to maintain Moth on all allies, as well as enemies. This'll return health to you constantly, allowing you to use Bloodsucker on enemies, without worrying too much about your health.
2. In a pinch, you can repeatedly spam Moth on an ally or your Queen to heal yourself. The health return isn't huge, but will keep you topped up.
3. Moth lasts 6 seconds. If it's applied on enemies and allies, use this time to reposition or deal damage without worrying too much about constantly reapplying it.
4. Bloodsucker will always deal 15 damage to yourself when hitting an enemy or ally. Don't overuse it, as it can leave you vulnerable.
5. Hitting your Queen with Bloodsucker will cause it to explode, and won't deal damage to yourself.
6. When you've cast Panic on an enemy, hit them with Bloodsucker and Moth. It's gaurenteed damage they can't avoid.
7. Infest can be used on allies, enemies, your Queen or the central Orb. Being inside an object (or player) makes Pestilus totally immune to damage. You can then decide which direction you want to exit.
8. Remember that enemies or allies who are Infested take greater and/or less damage (respectively). If an ally is under heavy attack, use Infest on them to mitigate a high amount of damage they might take.
9. Infest buys Pestilus considerable time, and allows him to reposition. When he's being tunneled by multiple melee Champions, try to always travel inside something to buy you extra breathing space.
10. Try not to miss with Infest. If you do, you'll only have Queen to rely on to body-block from follow-up dive.
11. Infest heals you and allies for 8 health. It's not a lot, but does help to regain some of your total percentage.
12. Queen is integral for Pestilus, as it forms so much of his potency. Whether body blocking, zoning, healing, causing Panic - wasting it is not an option. Always try to keep it alive.
13. Use Queen to block key attacks, such as Rook's Rush, as this'll directly prevent their effects (the Queen takes the hit for you).
14. Remember to detonate Queen with Bloodsucker to panic anyone near it (especially if Arachnophobia is on cooldown).
15. You can spam Moth on Queen to constantly heal it, and yourself.
16. It's not worth poking with Arachnophobia as it's easy to avoid from a distance. Use it in medium to close range, so that it lands directly on enemies.
17. Against melee Champions such as Croak, don't instantly use Arachnophobia when they're next to you. Typically they'll be anticipating it, so use it when they're out of "outs".
18. Use Swarm on a front-line Champion that's in amongst the enemy. It'll explode, sending Moth to all nearby enemies.
To read the latest guides, news, and features you can visit our Battlerite Game Page.
