


Overview
Rook is an incredibly powerful melee Champion that has a highly versatile kit. Although he's fairly straightforward in how he plays, relying heavily on Rush to engage opponents, there's still a great deal of depth to his gameplay. With the ability to heal himself, attack from afar, and prevent damage with his counter, there's little wonder he's so highly regarded.
A mighty chieftain running into battle with a giant hammer in one hand and his dinner in the other, Rook likes to smash his enemies, with boulders, with hammers and even his body. Once he goes berserk he turns into an unstoppable force.
Although mobile Champions can avoid Rook fairly easily, a skilled Rook player can still bait these with ease. Use of his Boulder Toss also ensures he only needs to engage when the time is right, while he brings plenty of crowd control to dictate play. With effective use of his Smack and Crushing Blow (especially with the right Battlerites), there's few who can compete against him.
Updated: 4 April 2018
Pros
Cons
Incredibly stick if he lands Rush repeatedly
Weak against highly mobile Champions
A kit full of utility and disruptionHis counter is fairly easy to avoid
Very high burst potential
Very poor if he can't reliably land Rush
Tremor is exceptional for zoning and finishing off low health players
Crushing Blow now triggers counters
Lots of sustain thanks to his self-healing
Struggles against high sustain Champions (Ruh Kaan/Raigon)
Abilities

Pummel (LMB) - Rook's basic attack allows him to deal moderate damage and with a fairly fast swing, he can quickly chew through opponents who allow him to him them. What's particularly powerful about Pummel is the fact it reduces the cooldown of Crushing Blow, one of Rook's strongest abilities. Ideally you want to be landing Pummel as often as humanly possible in order to deal high damage, but to also maintain your up-time on Crushing Blow.
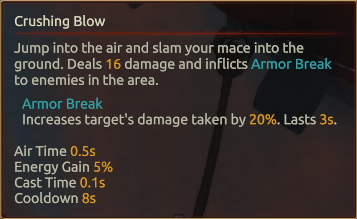
Crushing Blow (RMB) - Crushing Blow allows Rook to break the armor of an opponent, increasing his damage by 20%. Not only that, but it also deals AOE impact damage while acting as an i-frame (you're invulnerable while leaping). Ideally you want to land Crushing Blow after Rush and several melee attacks, in order to then grant you additional follow-up damage. It's also really important as Rook to use Crushing Blow in order to avoid key abilities. Try not to waste it if you can't make use of the i-frame, or damage bonus.

Rush (Space) - Fundamental to Rook's play, Rush allows him to charge at frightening speed in a straight line. Anyone he hits takes instant damage and is stunned for half a second. As an engage tool, it's one of the best in the game and despite its clear tell (Rook shouts before charging), it's very hard to avoid. Ideally and due to its short cooldown, you want to hunt down a key target repeatedly as they'll struggle to escape. It's also worth ensuring that you use Rush on a target that needs interrupting: a Champion such as Sirius can see their Ultimate instantly cancelled if Rook smashes into them.

Berserk (Q) - Unlike many other counters in Battlerite, Rook can move while using Berserk. This provides him with the ability to step in front of attacks in order to go Berserk. Once he has, he gains a handful of buffs that significantly increase his damage potential. Ideally you want to be using Berserk aggresively so that when it triggers, you're immediately next to an opponent, allowing you to pummel them quickly. It's also worth noting that the movement speed increase of Berserk is great for allowing Rook to retreat, especially if he's low health.

Boulder Toss (E) - At face value Boulder Toss doesn't appear particularly great, but its value is undeniable. As your only form of ranged poke, it not only deals high damage but knocks enemies (and objects) back. Whether you're poking from afar, or trying to secure a low health Orb, Boulder Toss is invaluable. When paired with Crushing Blow (with stun) or Smack (incapacitated) it also allows for Rook to deal crazy burst damage: Smack > Boulder Toss > Crushing Blow can eat any Champion alive. If you can, it's also worth saving so that you can throw it towards a team-mate under pressure; any enemies attacking them will be knocked back.

Smack (R) - Smack allows Rook to knock enemies back. The arc is wide and if an enemy lands against scenary, they're incapacitated for 2.5 seconds. This buys Rook time to attack elsewhere, secure Orb, replenish his health or drop a Boulder Toss > Crushing Blow combo. If you can, try to always use Smack to Incapacitate - the knockback alone isn't half as valuable. Just be conscious of the fact that it takes 1 Focus which could sometimes be better served using Eat instead.
EX Abilities

Eat (Shift + LMB) - Part of the reason why Rook is so strong, Eat allows him to heal himself every time he has 1 Focus. It might not sound much, but it's a level of sustain that gives him amazing amounts of survivability, especially when combined with Berserk. Ideally you want to use Eat as much as possible even if that means you rarely get to use your Ultimate. Surviving, while dealing damage, is often far more important to Rook's play.
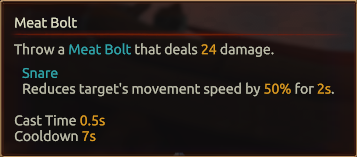
Meat Bolt (Shift + RMB) - As your secondary projectile (next to Boulder Toss), Meat Bolt allows Rook to slow an enemy from afar. In most instances you'll rarely use it (it costs 1 Focus) as Eat is often much better use of your resources. If you're against a Champion that insists on evading you, a shot with Meat Bolt can give you enough time to land a perfect Rush.
Ultimate Ability
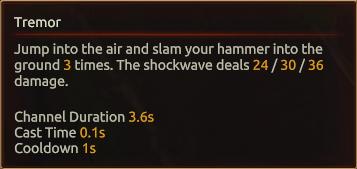
Tremor (F) - Providing Rook with a ranged AOE attack, Tremor leaves Rook vulnerable while blasting down. As long as he has the health pool, he's more than capable of cleaning up against low health Champions once his Ultimate winds up. The only downside to Tremor is the fact the swings are predictable and skilled players can usually avoid it. In most instances Rook players tend to use Eat instead of saving their Focus for Tremor.
Like our Rook build guide? You can help support its updates by subscribing to Ten Ton Hammer. Here's the details.
Gold : $1.00 USD - monthlyPlatinum : $5.00 USD - monthlyMaster : $10.00 USD - monthlyGrandmaster : $20.00 USD - monthlyLegendary : $50.00 USD - monthlyBattlerites

Squash
By default Crushing Blow is good, but it's not quite extraordinary. Squash brings it up to a whole new level, allowing Rook's RMB to deal high damage, armor break, and stun for 0.5 seconds. Although its duration is short, its potency can't be in doubt. Whether interrupting a key ability, buying you time to escape, or peel for a team-mate.
Frenzy
Frenzy allows Rook to enter in Berserk every time he successfully lands Rush. Although the duration is brief (1.5 seconds), it allows Rook to quickly deliver a flurry of melee attacks before landing his Crushing Blow.
Rook Smash
A simple Battlerite but one that's effective. Rook Smash allows Rook to deal 6 bonus damage on Crushing Blow, ensuring his highest damage rotation deals even more.
Endurance
Simply because Rook relies so heavily on Rush, having its cooldown reduced by 1 second and 1.5 seconds if you miss a target allows him to get quickly back into a fight. Endurance isn't mandatory, but it does take the edge off those costly misses.
Giant
Allowing Rook to reduce the damage he takes during Berserk by 30%, Giant is fairly mandatory for Rook. Considering you want to trigger Berserk after Rush, ideally when enemies retaliate, it allows you to withstand more punishment, but also grants you much needed mitigation when replenishing your health or retreating.
Matchups
These Hero Threat Levels (1 being lowest threat and 10 being highest threat) are to help you determine which enemy Heroes can give you a headache. For the Heroes listed here, take extra care as they're particularly dangerous for Rook.
Hero
Threat
Croak: A good Croak is relentless and can easily avoid your Rush. He can also poke you from afar and generally be a headache.
7/10
Ezmo: She can counter your dive, shield herself and avoid your Ultimate with ease. Very frustrating to fight when she can slow you.
8/10
Raigon: He can be absolutely relentess if he chases you and he can avoid most of your abilities. 9/10 Ruh Kaan: With an ability to attack you while countering, Ruh Kaan can trade with you easily and poke from afar with little worry. 9/10 Shifu: If he baits your counter, Shifu can chase you endlessly. Unless you land stun, you're in trouble. 9/10Tips
This list of tips and tricks are just a handful of things we think will help your Rook play. We'll continue to add to the list as required and if you have any tips you'd like to share, let us know in the comments below and we'll place them here.
1. Pummel is your primary source of damage once next to enemy Champions. You should be constantly swinging away the moment you're in someone's face.
2. Remember that Pummel reduces the cooldown of Crushing Blow. Ideally you want to shave off as much time as possible from the ability so that you can avoid incoming damage, or to stun an opponent (with Battlerites)
3. As tempting as it is, remember to stop using Pummel against a counter-heavy composition. One stray attack can trigger them, so always watch out for it against Champions such as Varesh or Sirius.
4. Crushing Blow is an i-frame, allowing Rook to leap and become invulnerable for a brief second. Use this to avoid key abilities that can seriously hurt you.
5. Crushing Blow triggers counters, even with the Squash Battlerite. As tempting as it is, try to resist using it against a Champion using their counter.
6. Don't use Crushing Blow the moment you Rush into an enemy Champion. Use the brief stun period to land several Pummels, before using Crushing Blow (followed by more Pummels).
7. Enemy Champions will typically attempt to move away from you when affected by Crushing Blow. Throw Boulder Toss at them to make use of their lowered armor.
8. Crushing Blow can affect multiple enemies at once. If possible, always try to snag more than one player so that there's AOE pressure across them.
9. You can cancel Rush before it activates by pressing "C". Use this to bait the enemy as Rook will still shout, even if you cancel the charge. Some players will use an important defensive ability expecting you to immediately Rush at them. Once they have, you can Rush onto them for real.
10. Rush inflicts a stun on impact and can cancel channeled abilities such as Sirius' Ultimate.
11. Rush deals more damage based on the distance traveled. Always try to use it at maximum range if you can.
12. As powerful as Berserk is for playing aggressively, you can use it defensively. Once you trigger it, use the movement speed increase to zip away.
13. The invulnerability of Berserk only lasts 1 second. Use this to avoid a key ability that most players will fire once you're in front of them.
14. If an ally is under pressure, throw Boulder Toss onto them. Anyone next to them will suffer damage, be knocked back, and your team-mate will gain valuable time to escape.
15. Boulder Toss knocks enemies away based on their proximity to the central boulder splash. To knock something (or someone) towards you, hit them with the inside edge of the rock (rather than the outside).
16. Smack is strongest when used to knock enemies into scenary. Ideally, always aim to do this by respositioning your body.
17. Rook relies massively on Eat for sustain. In most instances, you should constantly be using your EX-LMB in order to keep your health topped up.
Thanks for reading our Rook build guide. You can help support its updates by subscribing to Ten Ton Hammer. Here's the details.
Gold : $1.00 USD - monthlyPlatinum : $5.00 USD - monthlyMaster : $10.00 USD - monthlyGrandmaster : $20.00 USD - monthlyLegendary : $50.00 USD - monthlyTo read the latest guides, news, and features you can visit our Battlerite Game Page.
