


Overview
Gazlowe has one of the worst reputations in Heroes of the Storm because - and this is purely from my experience - he appeals to beginners. As such, more often than not you'll find the majority of Gazlowe's are fairly terrible. They stay in lane, do nothing but camps and avoid all team fights. It's the wrong way to play him because when he does support a team properly, he's absolutely brilliant to have around.
Both his heroic abilities are excellent during any team fight, his ability to stun with Explodium Charge's highly useful when retreating and his turrets are exceptional at providing support to your team or zoning out enemies.
Gazlowe takes a lot of skill to play well and he needs exceptional understanding of Battlegrounds. Despite that, in the right hands he's now a hero you have to be wary of.
Updated: 17 March 2017
|
Pros |
Cons |
|---|---|
|
Amazing at area denial thanks to his turrets |
Terrible basic attack damage against Heroes without his Heroic |
|
Superb at pushing lanes due to his turrets and bombs |
Relies heavily on others to do the heavy lifting in team fights early game |
|
Two very good Heroic abilities |
Has a terrible reputation - expect some abuse! |
| An invaluable stun with Xplodium Charge | Turrets need to be setup in advance |
| Deth Lazor is amazing for wave clear | Can be focused easily if out of position |
Abilities
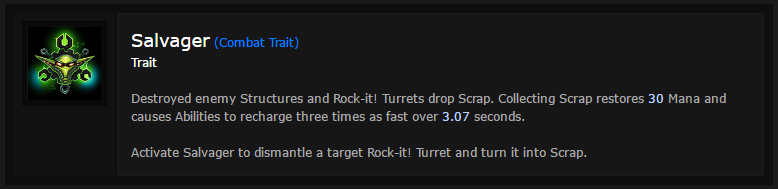 Salvager (Trait) – Using your trait effectively means that you can hypothetically sustain your mana in lane indefinitely. Of course, you will need to sacrifice a turret to do so, but it is often well worth it. The ability to constantly push waves, poke your enemies, and never run out of mana can be quite difficult for your enemies to deal with.
If you can, always try to activate your trait on an un-used Rock-It! Turret so that you gain the scrap to speed up your cooldowns and gain more mana. Key to your sustain is ensuring you regularly recycle.
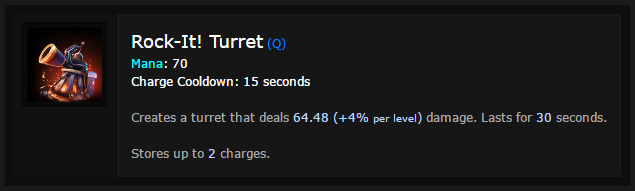
Rock-It! Turret (Q) – Gazlowe’s turrets do it all: push waves, tank tower shots, protect against ganks, and easily contest objectives. Later in the game, they can be used to easily solo merc camps, or even a boss. When team fighting, it’s important to think of your turrets the same way you do your forts; fight around them, and it’s like having a sixth team member. Fight away from them, and you’re missing a lot of potential damage. Just be conscious of the fact your turret's can die quickly if focused and it's best when taking a camp or pushing to always have two placed down.

Deth Lazor (W) – Aside from having a fantastic name, this ability can be quite effective when used against unsuspecting opponents. Whenever possible, charge up your Lazor from the fog of war, utilizing the long range to get free and substantial damage down on your opposing laner. During team fights, use the chaos to charge up and get a strong Lazor across multiple members of the other team. Later game, at level 16, Deth Lazor deals enormous damage and can comfortably pressure (and wipe) and team that's mid to low health.

Xplodium Charge (E) – Along with your turrets, Xplodium Charge provides extremely strong wave clear. It can be difficult to hit enemy Heroes with this ability by itself, but late game and during any fight it's amazing for zoning the enemy team or dealing damage against an unsuspecting player. The range of Xplodium Charge is pretty large so don't be afraid to poke with it in order to pressure enemies away.

Robo-Goblin (R) – This Heroic allows Gazlowe to become a monster in melee range. When activated he not only gains movement speed (which is amazing when trying to escape) but it also provides 30 armor, reducing the damage he takes by 30%. Although it only lasts 4 seconds, the passive is permanent and bolsters his basic attack damage by 100%. There are few squishy heroes you can't kill with Robo-Goblin 1 on 1 and as with its previous iteraiton, it still allows you to solo a boss easily.

Grav-O-Bomb 3000 (R) – Drop this Heroic in the middle of a team fight, throw in Xplodium Charge in the middle, charge up your Deth Lazor and you have untold amounts of destruction at your fingertips. Proper placement of this ability can be absolutely game-changing, as you’ll either deal massive damage to the enemy team, or cause them to scatter and flee, creating favorable conditions for your allies to chase them and pick off opposing Heroes who are now out of position.
Talents
Level 1: Break It Down!
Scrap is key to Gazlowe having short cooldowns. Each Scrap reduces the cooldown on his skills by three times, over 3 seconds. Break It Down! increases this to four times as fast. When you dismantle your turret's, it allows you to use them again much quicker.
Level 4: Reduce, Reuse, Recycle
Reduce, Reuse, Recycle provides a 15% chance to obtain scrap from minions, creatures and structures that die near Gazlowe. Considering Scrap reduces your cooldowns significantly, it's very useful for laning.
Level 7: Hyperfocus Coils
Dethlazer is your best poke skill and allows you to clear waves, attack the enemy from afar and generally be a nuisance. Having it charge twice as quick thanks to Hyperfocus Coils is a must. Better still, it also lowers the cost of his Deth Lazor by 30.
Level 10: Robo-Goblin
Gaining significant movement speed from Robo-Goblin is partly why it's so good now. It's a much needed escape tool while the 100% increased melee damage allows Gazlowe to become a bruiser in team fights (especially with a 30% damage reduction).
Variable: When you plant the Grav-O-Bomb 3000 you'll pull enemies towards the middle of the explosion and deal high damage. It's incredible for a team spike and even better if you pre-plant a Charge. I'd still argue Robo-Goblin is now more reliable, but his bomb remains viable against uncoordinated teams.
Level 13: Goblin Fusion
Goblin Fusion provides an additional charge to your Deth Lazer, increasing its damage by 100%. It's now a high spike, low cooldown, burst machine. Used against any team at maximum range, it deals absolutely massive damage.
Variable: X-Tra Large Bombs provides a 30% increased radius on your Xplodium Charge (wow!) but also allows Gazlowe to drop one at his feet when he suffers crowd control. It's amazing against heroes such as Malfurion or Varian.
Level 16: Kwik Release
Even though this build doesn't focus on Xplodium Charge (unless you take the level 13 variable) Kwik Release is still his best 16. Having two charges is amazing for quickly firing both out to zone the enemy team and if you did take X-Tra Large Bombs, fantastic for snagging players.
Level 20: Mecha-Lord
Boosting your basic attack damage by a further 100%, Mecha-Lord also passively grants Gazlowe 25 armor. Gaining 25% permanent damage reduction is amazing and when he does activate it, he has 55% mitigation. He becomes a brawling monster.
Matchups
These Hero Threat Levels (1 being lowest threat and 10 being highest threat) are to help you determine which enemy Heroes can give you a headache. For the Heroes listed here, take extra care as they're particularly dangerous for Gazlowe.
|
Hero |
Threat |
|---|---|
|
Lunara: Her mobility, nuisance poison and vision make her a challenge for Gazlowe. Your turrets can track her but she'll comfortably poke you down. |
8/10 |
|
Thrall: His root, ranged poke and self healing are very difficult to deal with. Your heroic can buy you time, but he'll stick wreck you. |
8/10 |
|
The Butcher: You can't really kill him unless he's near death and if he sees you and you're out of position, you're dead. |
9/10 |
|
Illidan: Evade, self healing, mobility, damage - he's a headache you just can't get rid of. Your Robo-Goblin won't save you. |
8/10 |
| Samuro: His decoys are a real pain and it's often difficult to track which is which. Even if you do identify the real one, he'll comfortably escape before returning for you. | 8/10 |
| Varian: His Parry, Charge (stun) and either Heroic (Colossus Smash or Fury) will destroy you very quickly. He's also tanky enough with his Parry to withstand your attacks. | 8/10 |
Tips
This list of tips and tricks are just a handful of things we think will help your Gazlowe play. We'll continue to add to the list as required and if you have any tips you'd like to share, let us know in the comments below and we'll place them here.
1. Always, always, always help in team fights. No exceptions.
2. When there aren't team fights, push your lane - hard. Once the first set of towers is down, move to a new lane.
3. If you have the time and team fights aren't imminent, clear camps. After level 4 you can do this easily and quickly.
4. After level 10 Gazlowe can comfortably solo a Boss. You can sometimes sneak and do this before anyone even notices you're missing - just place your 3 turrets down and go at him.
5. Try to always save your Robo-Goblin for securing a boss or when being "ganked". The armor, movement speed and damage bonus can save your life or allow you to turn on the enemy.
6. Your Deth Lazor has good range and damage - make the most of it in a team fight and be quick about booting it up form the back line.
7. Remember to pick-up Scrap that your turrets or structures drop. It'll reduce the cooldowns of your abilities and gives you mana.
8. Try to avoid fighting enemy Heroes 1 on 1 unless your Robo-Goblin is available. If it isn't, you''ll die easily.
9. Gazlowe can bully just about any hero in lane. Place your turret's so they overlap, use your lazor and push hard. Few can stop you.
10. Be very conscious as Gazlowe of over-extending. Unless you have Robo-Goblin available if you push too far down a lane and are set upon by enemy players, you won't escape. Keep an eye on the map.
To read the latest guides, news, and features you can visit our Heroes of the Storm Game Page.
