


Dragon Shire is a three-lane battleground set in the realm of King's Crest. The Dragon Knight, in the center of the Battleground, lies locked in the Dragon Altar. Teams must capture and hold the two shrines at the top and bottom of the battleground, after which a Hero may channel the Dragon Altar to control the Dragon Knight.
The first Shrine event will activate 90 seconds into the match, following a 30-second warning. Shrines will consistently be activated 2 minutes after a Dragon Knight has been killed.
The Draft
There’s five important factors to Dragonshire that are fundamental when choosing your draft.
Solo: A Hero who can sustain themselves on top lane, without fear of 1 on 1 encounters.
Roaming: A composition capable of covering the middle and bottom lane, while clearing both quickly.
Camp clear: A group of Heroes able to take camps quickly (solo if necessary)
Sustain: A support able to provide significant amount of sustain, whether through low mana costs (to be able to heal for long periods) or to heal for lengthy periods of time (such as Stukov or Malfurion).
Roles: A mix of range and melee damage is essential for clear, and fighting over an altar.
Solo
It’s incredibly important in Dragonshire to draft a Hero who can solo lane with ease. They need to be able to win their lane, and reliably capture the Dragon Altar without worry of fighting 1 on 1. Heroes who excel here include:


While this list isn’t exhaustive, making effective bans against solo laners can instantly allow you and your team to gain an edge over your opponents. Fundamentally, if you can always maintain capture of the top lane, this frees up the rest of your team to roam and secure camps without too much worry of losing or forcing capture of the bottom Dragon Altar.
Roaming
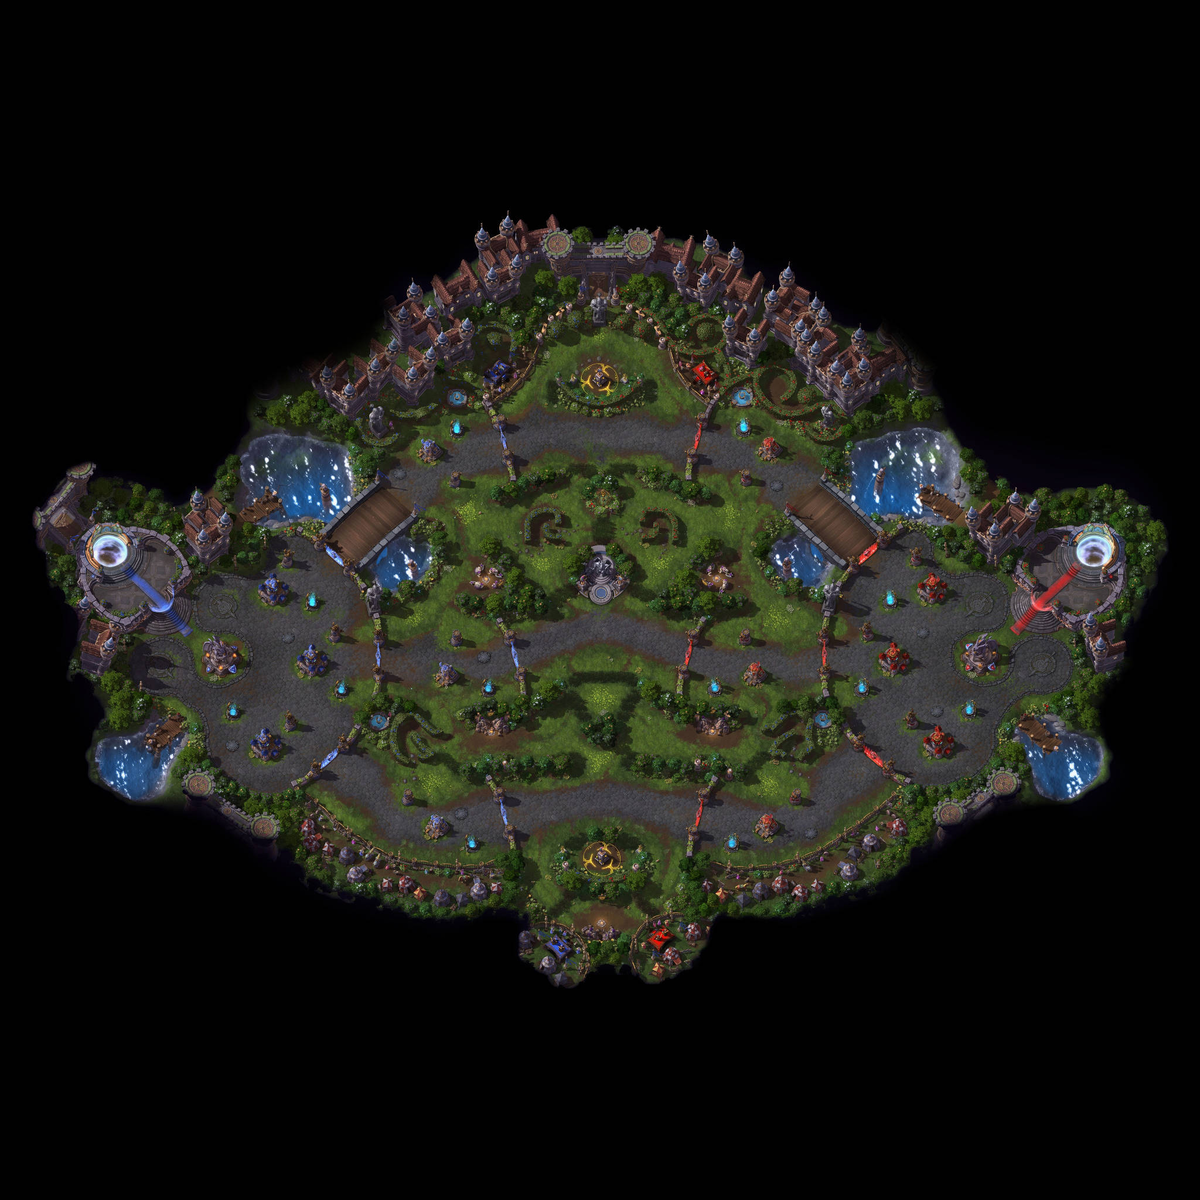
An aerial view of Dragon Shire, displaying the central statue and the Dragon Altars at the top and bottom lanes.
Dragonshire is a small Battleground, and the rotation between middle and bottom lane takes seconds. Roaming as four Heroes - while your solo laner holds top - is incredibly important. Not only does this allow you to soak two lanes at once, but also ensures you don’t have to devote a single Hero to sit in the middle lane full time. If the enemy team aren’t roaming as a four, you doing so will not only allow you to “gank” quickly, but also keep lanes pushed. Even when you need to take a camp, one (or all of you) can rush this to ensure no experience loss.
Notable mentions: For roaming Dragonshire, Xul works exceptionally well. If he remains with a 3 others, his Trait can activate constantly across both lanes, ensuring the enemy team are pressed back while taking them significantly longer to clear their lane.
Camp Clear
Ideally you want your composition to include a Hero - separate from your solo laner - who can quickly and easily clear camps. This does limit your draft somewhat, as most “solo laners” typically clear camps quickly. However, there’s a few options here (excluding the solo laners listed above):


These all excel at roaming, while having lane and camp clear. Even Knights, the toughest camp to take in Dragonshire, aren’t difficult for those above. While the likes of Sonya, Malthael and Zagara can also clear camps with ease, it’s best if you double-up on those who are capable, to ensure no experience loss on the top lane.
Sustain
Dragonshire is often won and lost on who controls the solo lane, but also who can outlast the opposition on bottom lane. Bottom lane tends to be a tug of war, with Regeneration Globes and Fountains offering solid sustain for both sides early game. The make-or-break difference is often the choice of Support you draft. As it stands, the go-to Supports for Dragonshire are:


In most instances, all these Heroes have low mana costs, bring crowd control, and as a result, offer plenty of sustain. While Ana and Brightwing are arguably on the fringes of the meta, I’ve found both to be exceptional on Dragonshire. The former purely because of her Sleep Dart and ranged healing (which she can comfortably manage away from the Dragon Altar itself), while Brightwing’s global ensures she can - if needed - move between the bottom and top lane to help those in need. Where the other Support Heroes are concerned, they simply offer the best healing over time, with very low mana costs (which bringing a valuable knockback, root, and silence, respectively).
Roles
In general, I’ve found it’s best to draft one support, one solo laner, one Warrior, one ranged dps, one AOE dps. If you’re confident in your composition, swapping out a single target ranged DPS (such as Hanzo) for another frontliner is absolutely viable, as this can make your team particularly tough to bring down. Regardless of whether you pursue more damage, or more survivability (as a team) you need a well rounded composition. Here’s my recommendations for the spots that are up for grabs:
- Ranged DPS: Falstad (global), Fenix, Hanzo, Lunara, Nazeebo, Tracer, Valla,
- AOE DPS: Gul’dan, Jaina, Kael'thas, Li Ming, Junkrat
- Warrior: Arthas, Blaze, Dehaka, Diablo, Muradin, Johanna
- Front-Liner: Maiev, Thrall, Varian
Tips
1. When you have the opportunity, always take camps. These will stretch the enemy team, forcing them to commit less players to a Dragon Altar.
2. Don't take camps if it means you'll hand the enemy team two Dragon Altars. It sounds obvious, but it's something I've seen all the time.
3. Dying is punishing on Dragon Shire, as a death can allow the enemy team to snowball a Dragon Altar, secure more kills, and capture a Dragon Knight. If you're low, play safe and don't die.
4. Over-rotating isn't always a good thing on Dragonshire. Losing a player to the top of middle lane can see you instantly lose the Bottom Dragon Altar - typically on numbers alone. Ideally, only rotate if you secure a kill or if one of the enemy team returns to their Core.
5. Have confidence in your solo laner in Dragonshire. If you've banned effectively, Dragonshire is often won or lost on your team's ability to hold the top lane. At the very least, if your top lane is gaurenteed, it frees up you and your team to play that little more aggressively.
6. Try to destroy the enemies Fountain near their Fort as quickly as possible. This'll stretch the enemy team significantly, as they'll be forced to return to their Core when their mana is low.
7. If you've a Hero with a global travel ability, only use it when you can gaurentee the capture of a Dragon Knight. Often I'll see a solo Dehaka move to the bottom lane, capture it, but this then leaves their lane abandoned. The result is lost experience and a flipped Altar. Ideally, use your global as you near towards level 10 (or to save a life) so that respawn timers are longer.
8. When you capture a Dragon Knight, aim for the top and bottom lanes. Try to take down the gate/Fountain on each, so that the next event timer is easier for your team.
9. When inside the Dragon Knight, roam again with your team. You need them to help soak damage against the Dragon, so the Dragon can freely deal damage.
10. Try to avoid your Support capturing the Dragon Knight. If they do, it'll leave your team very vulnerable during a push.
11. If you've died, it's always a good idea to head straight to the middle lane. This'll likely prevent a capture, but also allow you to quickly soak some experience as your three allies hold the bottom lane.
12. When the enemy team begin to release their camps, kill them as a group. Even if you all need to rotate top lane.
To read the latest guides, news, and features you can visit our Heroes of the Storm Game Page.
