


Overview
The Division 2 is a beautiful, but demanding game and one that will likely test most people's computers to the limit if you want to run it at maximum settings. Unless you’ve a hefty PC, there’s really no need to set everything to Ultra in order for the game to look gorgeous. In this advanced graphics settings guide, I've put together optimal settings you should take to get the best framerates, without compromising on appearance.
What's great about The Division 2 is the fact you can also run a Benchmark within the client as you tinker with settings, to see the changes in real time. Unfortunately, you will have to regularly restart the client for some effects which can slow down the process. In every case, there's no discernable difference between High and Ultra settings, but one will significantly impact frame rates: pretend Ultra doesn't exist. Finally, and as always, be sure to update to the latest NVidia drivers.
If you can't see the difference between the lowest and highest settings, who cares which you choose?
My Rig
- i5 8400K
- ROG STRIX Z370-E Gaming
- Corsair Vengeance 16GB 3600MHz DDR4
- NVIDIA Geforce 1070ti
Graphics
Graphics Quality
If you don’t want to mess around with any of the graphics settings, you can utilise the presets provides. Available in Low, Medium, High and Ultra, they’ll automatically configure your graphics. As you might expect, choosing the lowest option simply reduces just about everything: texture quality, foliage visibility and fog density. Increasing the graphics presets will slowly bump up the visual appearance of the game. Before we get started, it’s worth us taking a look at each setting and explaining what it does in the order that they appear in the menu.
V-Sync (On/Off)
For an official description:
“Screen tearing is a visual artifact in video display where a display device shows information from two or more frames in a single screen draw. The artifact occurs when the video feed to the device isn't in sync with the display's refresh.”
While there's a great deal of information surrounding V-Sync, screen tearing and its performance impact, TweakGuides are right to come to a general consensus on the issue:
1. Use 'Application Preference' for V-Sync in your NVidia Controlo Panel. This'll ensure that new games are always at their default - best settings for your system - and where your framrate is consistently higher than your refresh rate, enabling V-Sync is perfectly fine (and results in no drop in FPS).
2. Disabling V-Sync will ensure that you gain the maximum possible performance. While you may see some tearing as you move, it may be minimal and too little to see you switch V-Sync on and suffer the FPS loss.
3. If screen tearing really is too much for you, you should disable V-Sync and turn on Tripple Buffering from your Control Panel to minimize any FPS loss.
Frame Rate Limit
Frame Rate Limit Does exactly what it says on the tin, allowing you to set the limit of your frame rate. If you find it's regularly changing too much, and frustrating your gameplay (going from high, to low fps can be annoying when aiming), you're free to set your preference.
Shadow Quality
Shadow Quality is one of the primary settings that makes The Division 2 look great. Without Shadow Quality set to medium or above, the game looks horrendously bland. Fortunately it's not too taxing on any machine, and having it set to high - over medium - really doesn't have much impact on frame rates.
Spot Shadows

Spot Shadows are clearly noticable around light casts (medium versus high)
Spot Shadows determine the number of spotlight shadows that can appear onscreen. These are, from what I can tell, shadows cast from a lightsource that cut through another object. Similarly to Shadow Quality, there's no discernable difference between medium and high, but unlike Shadow Quality, Spot Shadows is more demanding on your system. If you can spare the fps, have it set to high. If not, select medium and you'll not notice the difference.
Spot Shadow Resolution
Building on the above, Spot Shadow Resolution simply applies the shadow resolution from that cast. Set to low, shadows look blurry and undefined. Set to Medium or High, they have greater clarity and sharpness. As above, there's only a real difference in Spot Shadow Resolution being set to Medium, if it's paired with Spot Shadows set to medium. Ideally, and for crisp shadows, try to run Spot Shadows at Medium, and Spot Shadow Resolution at High.
Contact Shadows
Contact Shadows basically provides a clearly defined dark shadow around objects where they meet the floor. It's intended to ensure that objects look grounded, with weight, as opposed to appearing floaty. Contact Shadows has such a small impact on the games' frame rate that you should set it to All High.
Resolution Scale
Resolution Scale allows you to render the game at a lower resolution, while scaling that up to your output resolution (but still keeping the UI the same). 100% Resolution scale effectively means that your game is running at a native resolution. Reducing this incrementally can significantly improve your frame-rates, without neccesarily providing a visual difference. Ideally, just run it at 100%, but if your machine is struggling, drop it to 75%, restart the game, and see if you A) like the appearance and B) gain frames.
Sharpening
A simple tool that doesn't need to be applied, and updates in realtime, Sharpening makes your image sharper, or softer, depending on your choice (from 1 to 10 - 10 being sharp). My personal preference is 7, but it's totally up to you, and there's no fps loss for any choice.
Particle Detail
Particle Detail determines how many particles certain effects emit. Set to Low, they release fewer than when set to High. It's bloody hard to tell either setting option, and fortunately, it has little to no impact on fps.
Volumetric Fog

Don't go thinking this is for the fog that rolls in when the weather in The Division 2 is bad, it's actually for light being cast, god rays, and light shafts. It's one of the few options that causes heavy fps loss, though the differences visually between medium and high are incredibly difficult to spot. As always, set to Medium by default, but if your fps doesn't budge on high, leave it as is.
Reflection Quality
Reflection Quality affects the frequency and resolution of global scene reflections such as skyscrapers and landmarks. It has such a small impact on fps that you should set it to high, and forget the setting exists (honestly, setting it to low doesn't help your graphics, and it won't help your fps).
Local Reflection Quality
Similarly to the above, Local Reflection Quality builds on the above, and sets their resolution on the reflection when nearby. Similarly to Spot Shadows, this can have an impact on performance. There's no visual difference from what I can see between Medium and High (or Ultra), so save yourself some fps and set it to Medium.
Vegetation Quality
I swear this Vegetation Quality doesn't do anything. I've been amongst as much greenary as possible, and still can't see any changes when it's set to low or high. Either setting had absolutely no impact on fps, so you might as well set it to the top.
Sub-Surface Scattering
Allowing light to cast through translucent objects, Sub-Surface Scattering costs almost no fps changes, so having it on will not only make the game look better, but you won't lose out either.
Anisotropic Filtering
Anisotropic Filtering functions similarly to any other by softening out jagged edges on objects. The differences between x1 and 16x are pretty noticeable in terms of appeareance and frame-rate, so I’d recommend you pursue x4. Inevitably, the higher the Anisotropic Filtering, the more frames you'll lose, although after x4, it's near impossible to tell the difference. It does however impact your frame rate (a difference of around 6-7 fps), and can be heavy on any system if you go for the x16. In most instances, x4 is a safe choice that looks great, and doesn't cost you fps.
Parallax Mapping
Providing textures with a sense of depth, Parallex Mapping has a moderate impact on how well The Division 2 runs. While the fps loss isn't huge when turned on, it's definitely worth the hit. Without it, textures can appear flat, and they lack the depth to allow them to stand out.
Ambient Occlusion

Low versus High settings on ambient occlusion (mostly noticable in the water)
Unlike in Anthem, The Division 2 provides options from Low to Very High for Ambeit Occlusion. I can't tell the difference between High and Very High, and even Medium to High is a stretch. While it's not massively demanding on your system, it's an option that will impact your fps. Depending on your rig, start at medium, note your fps, and then switch to high. You'll barely tell the difference visually, but can save yourself a few fps in the process.
Depth Of Field
Depth Of Field adds subtle out-of-focus blurring to distance objects around you. Strictly speaking, DoF has little effect on your frame rates. I’d always recommend you have it on as it does add a lovely visual element to the game, especially when viewing objects down scopes.
Object Detail
Probably one of the most important settings, Object Detail effectively determines "pop-in". Set to 1, the game will literally appear before your eyes as you run around. Set to 100, you'll notice no pop-in as you move around the world but you'll pay the price for it with your fps. This setting is going to be completely down to you, and how much pop-in you can stomach. Personally I hate it, and it gives me flashbacks of Black Desert Online. However, I have friends who barely notice pop-in and whom have the setting set to around 60. I've found 80 to be a good balance, with only a tiny amount of pop-in, without asking too much of my system. Set to 100 however, and you'll never worry about objects appearing, just be conscious of the fact you'll eat a lot of your systems' resources.
Lens Flare
As you might expect, Lens Flare simples allows you to have them turned on or off. I have to admit that the game uses them well, and they aren't too glaring. Has little to no impact on fps.
Vignette Effect
Similarly to the above, Vignette Effect slightly darkens the corners of the screen when playing to allow the center to have greater clarity and colour. Doesn't cost you anything, and looks great.
Water Quality
There's very little water in The Division 2, and what there is looks good by default. Water Quality uses so little of your system that you should set it to high and forget about it.
Chromatic Aberration
I’ve made multiple attempts to see how Chromatic Abberation affects Anthem, and I can honestly say that I’ve failed miserably. It has no impact on frame rate, and turning it on or off changes very little visually. In other games the effect can sometimes be really prominent, but in most instances folks turn it off as it can often cause discolouration on edges of scenary where whites meet black, and black meets white (typically resulting in blue or red hues).
Projected Texture Resolution
To me, Texutre Resolution is pretty important, but this setting - as far as I can tell - is based on your movement around the game world, though there's no real difference here between 256 and 512. Neither had any real impact on fps, and you can't really tell the difference between either.
High Resolution Sky Textures

No (left) versus Yes (right). Noticably less sharp.
A simple setting that allows you to turn them on or off. High Resolution Sky Textures simply makes one sharper than the other, and neither have any impact on fps.
Terrain Quality
Terrain Quality determines how quickly textures will load without needing to encounter a single load screen. Lowering the value of terrain quality enables textures at a lower resolution (1024x1024) whilst ultra places them at 2048x2048. Stationary it’s impossible to tell the difference between low and high. Even when I was sprinting I honestly couldn’t tell any difference regardless of setting. Fortunately, setting to High makes no difference to fps.
Tweaks
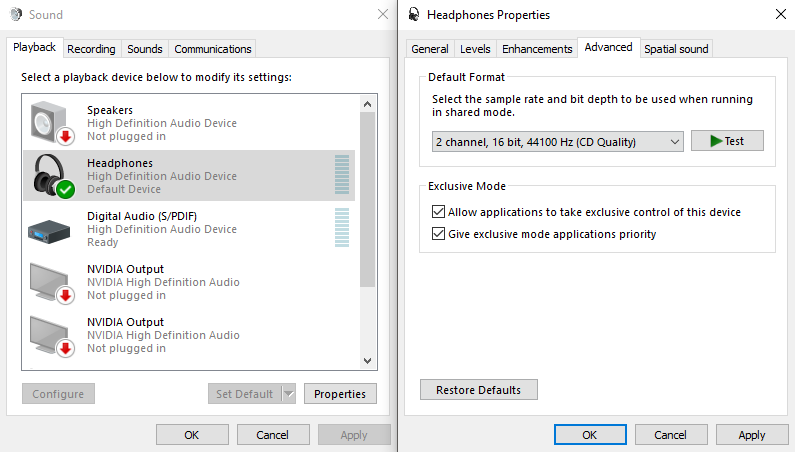
1. In your audio drivers UI, change the default format to 24bits 44100hz (studio quality) or as little as 16bit 44100hz . This has been known to fix some audio issues, such as ambiant noise not working.

2. In your NVIDIA Geforce Control Panel (not Geforce Experience) go to Manage 3D Settings > program settings > choose The Division 2. Select:
- Texture filtering - trilinear optimization ON.
- Texture filtering quality - PERFORMANCE.
- Texture filtering anisotropic sample optimization ON.
- Power management mode - Prefer maximum performance.
This has been known to improve frame rates for some players.

3. In your Control Panel, go to System and Security > Advanced System Settings > Performance Box [settings] > Advanced Tab > Virtual memory [change] and make sure your pagefile is set to your SSD and not your HDD. This can help with load times.

4. Adjust your Power Options for High Performance.
5. Clean Your Temporary Files.
- Press the Start button and search after %localappdata% and press Enter
- Open up the Temp folder
- Now press CTRL + A to select all files in the folder
- Press the Delete button on your keyboard to delete these temporary files. Skip the ones it can not delete.
- Finally, empty your recycle bin
Final Thoughts
The following Settings have very little impact of performance:
Sharpening, Particle Detail, Reflection Quality, Vegetation Quality, Sub-Surface Scattering, Depth of Field, Lens Flare, Vignette Effect, Water Quality, Chromatic Aberration, Projected Texture Resolution, High Resolution Sky Textures, and Terrain Quality. In all instances, these can all be set to High and you should notice no performance decrease (at most, 1 or 2 fps lost)
The following Settings have only a moderate impact on performance:
Shadow Quality, Contact Shadows, Parallax Mapping, Ambient Occlusion, and Extra Streaming Distance. This is primarily because of the fact they add a higher quality to your existing settings, and a layer of polish that makes The Division 2 stand out.
The following Settings have a heavy impact on performance:
Spot Shadows, Spot Shadow Resolution, Resolution Scale, Volumetric Fog, Local Reflection Quality, Anisotropic Filtering, Object Detail. All of these can significantly reduce performance, and all will see you gain significant fps if you tweak them.
Recommended Settings (System Dependant)
- Shadow Quality: High
- Spot Shadows: Medium
- Spot Shadow Resolution: High
- Contact Shadows: Medium
- Resolution Scale: 100%
- Sharpening: 7
- Particle Detail: High
- Volumetric Fog: Medium
- Reflection Quality: High
- Local Reflection Quality: High
- Vegetation Quality: High
- Sub-Surface Scattering: High
- Anisotropic Filtering: x4
- Parallax Mapping: Yes
- Ambient Occlusion: Medium (High if you can spare the fps)
- Depth Of Field: On
- Object Detail: 80 (60 if your fps is taking a hit, 100 if you can afford it)
- Extra Streaming Distance: 8 (100 if your fps can handle it)
- Lens Flare: On
- Vignette Effect: On
- Water Quality: High
- Chromatic Aberration: On (personal choice, no fps difference)
- Projected Texture Resolution: 256 (personal choice, no real fps differences)
- High Resolution Sky Textures: Yes
- Terrain Quality: High
To read the latest guides, news, and features you can visit our The Division 2 Game Page.
